After buying the iPod, the first thing you need to do is set up your iPod. If you use your iPod with Windows, it will become Windows formatted. If you use it with Mac, it gets Mac formatted. But what if you want to use your Windows formatted iPod on Mac, or use Mac formatted iPod on Windows? In that case, you need to reformat your iPod. In this article, we will tell you how to reformat your iPod to Work on PC or Mac.

If you have a Mac-formatted iPod and want to use it with a Windows computer, you will need to reformat it. If you have a Windows formatted iPod and want to use it with a Mac, you won't reformat it. That's because Macs can use both Mac and Windows formatted iPods, while Windows can only use Windows formatted iPods.
In order to reformat Windows formatted iPod for Mac, connect your iPod to your PC. Then follow the steps below.
Note: Before you reformatting an iPod, make sure that you've backed up songs, photos or other data on your iPod to the computer, since reformatting an iPod means erasing everything on it.
Best iPod Data Backup tool you want to know:

117,475 Downloads
FoneTrans - Best iPod Data Transfer/Manager
100% Secure. No Ads.
100% Secure. No Ads.
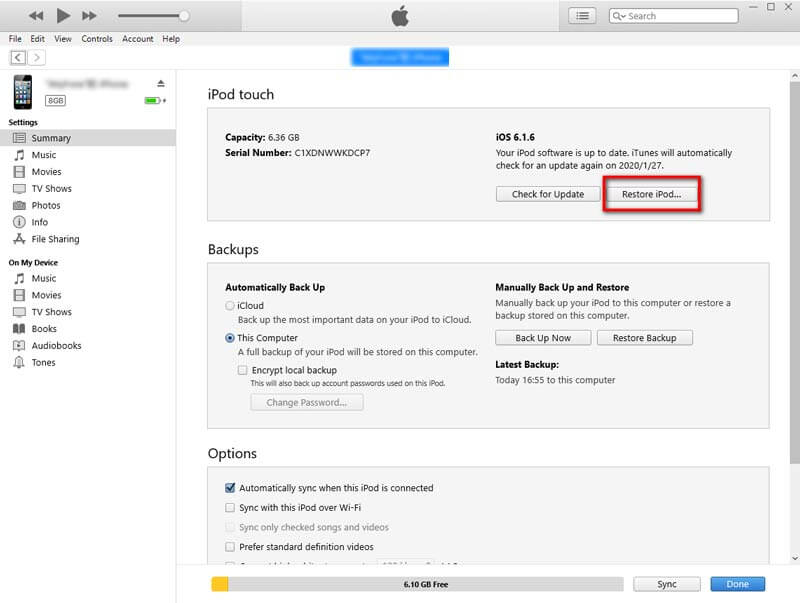
Step 1. Launch iTunes on your PC. Click the Restore button under the Summary Tab. This will reset your iPod and format it for Windows.
Step 2. Then, follow the on-screen instructions to download the latest firmware for your iPod.
Step 3. Once installation begins it will ask you for an Administrator's username and password. Enter this information then click the OK button. iTunes will then format your iPod. Once complete you will be asked to name your iPod, and then press the Done button.
With the same Supercell ID, you can enjoy Clash Royale game while keeping records on your new iPhone.

Now, you can re-sync your iPod with the computer that contains your iTunes Library. iTunes will ask you if you want to erase and sync the iPod. If you say yes, this will re-download your iTunes Library to your reformatted iPod.
1. Will reformatting an iPod erase songs?
Yes, formatting your iPod with iTunes will erase all music and data in your iPod, but that is no problem if you have backed up all the music in your iTunes library. That means you can check your songs, and you are also able to re-download them from iTunes library to your iPod.
2. How do I erase everything on my iPod classic?
To completely erase everything on your iPod Classic, the best and easiest way is to use Aiseesoft FoneEraser to erase your iPod all content and settings permanently. This powerful tool provides three modes to clean your data on iPod and any other iOS devices.
3. How to restore your iPod Touch to factory settings?
Just go to Settings > General, and scroll to the bottom of the screen and tap Reset. Choose Erase All Content and Settings. In the pop-up confirmation screen that states "This will delete all media and data, and reset all settings," tap Erase iPod.
4. How can I backup music from iPod to computer without iTunes?
For copying your iPod music to computer, you can use Aiseesoft FoneTrans mentioned in this article to help you backup music or other data on iPod in one-click. This iOS transfer is the best iTunes alternative for you to transfer photos, music, contacts, videos, and much more from iPhone/iPad/iPod to your computer or reversely. When you change an iPhone, you won't have to worry about how to transfer the contacts, music and other data to your new iPhone.
Conclusion
You can master the basic knowledge of digital images, and know how to enlarge the photo before printing. The article also answered some frequently asked questions about the related information, such as PPI and DPI. When you need to enlarge a picture for printing without losing quality, you can feel free to download Aiseesoft Image Upscaler to upscale the photos for you accordingly.

The best iOS Transfer software to manage and transfer iOS files from iPhone/iPad/iPod to your computer or reversely without running iTunes.
100% Secure. No Ads.
100% Secure. No Ads.