How to Fix Grainy Photos: A Step-by-Step Guide for Beginners

Everyone can snap a photo that looks amazing on your camera's screen. However, when you transfer it to your computer, you see unsightly grain. It can be incredibly frustrating, especially when capturing a special moment. Grainy photos are a common issue, and with a few simple techniques, you will know how to fix grainy photos and turn them into sharp, professional-looking images. This guide is accessible to everyone, from beginners to experienced photographers. We will also discuss fixing grainy photos without Photoshop on your iPhone and Android phones. Prepare to bid farewell to annoying sounds and welcome perfect images that truly capture the spirit of your moment!

How to Fix Grainy Photos

Part 1. How to Fix Grainy Photos in Photoshop

Have you ever taken a photo in the dark, only to find out it looked all grainy? It’s not that hard to achieve! Thanks to Adobe Photoshop, the most used photo editing tool, getting rid of that grainy look is easy. It has many cool features, like a noise reduction tool that works wonders. In this part, we will dive deep into how to make photos less grainy using Photoshop. We'll show you how to get familiar with the software, find out the tricks to eliminate that noise, and teach you how to make your photos clearer and sharper.
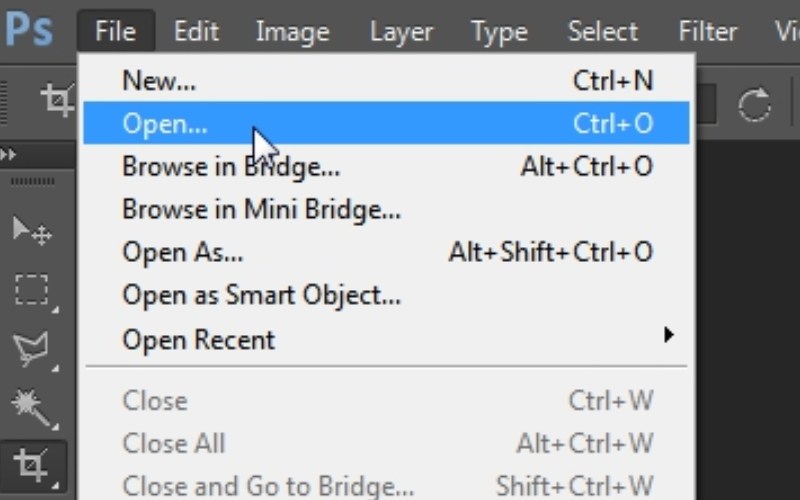
Step 1.
Launch the Photoshop application on your computer. Head to the File menu, pick Open, or hit Ctrl+O on Windows and Command+O on Mac. Find your grainy photo on your computer and click Open.
Open Photo In Photoshopas
Step 2.
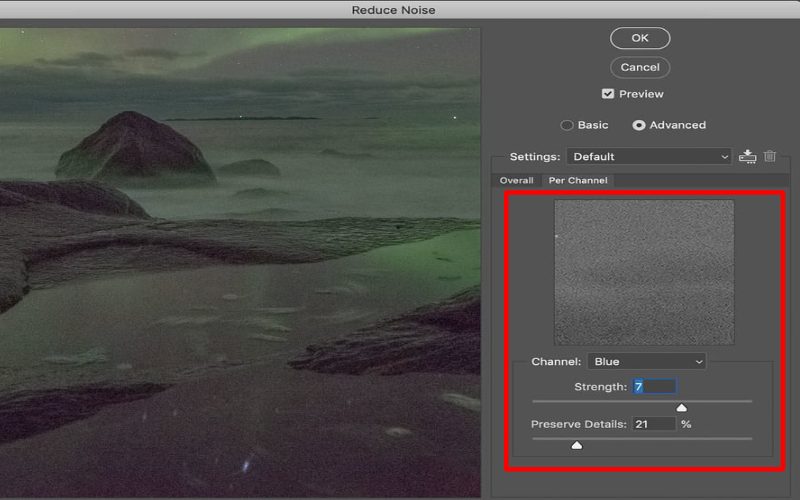
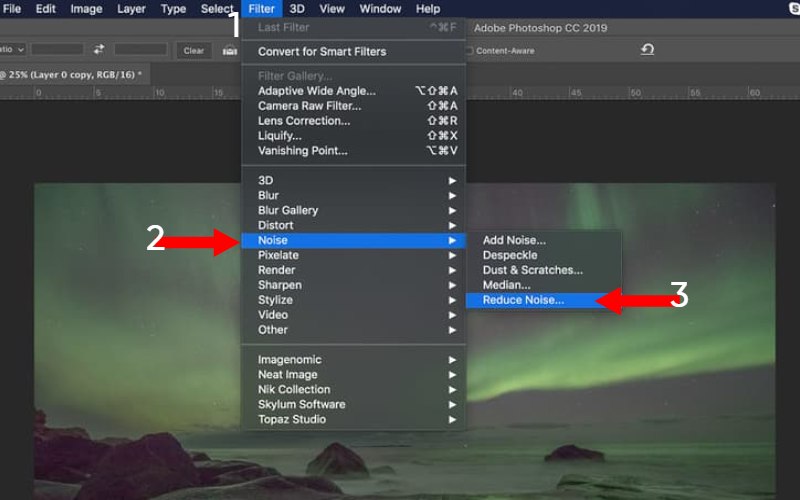
Go to the top menu bar and select the Filter tab. Select Noise from the dropdown menu, then click Reduce Noise.
Select Reduce Noise
Step 3.
A pop-up window called Reduce Noise will show up. This slider lets you control how much noise you reduce. Slide it to the right for more noise reduction, but be careful not to make everything too blurry. This slider helps keep your image sharp while cutting down on noise. Click to increase it if you want to keep the sharpness, especially around edges and textures.
Adjust Noise Sliderr
Step 4.
The Preview checkbox lets you see how your changes look right away. Hit it and turn it on and off to see the difference between the original and adjusted versions. Click OK to reduce the noise once you're happy with the settings.
Preview Changes And Apply

Part 2. How to Fix Grainy Photos without Photoshop

Method 1. Fix Grainy Photos For Free with Aiseesoft Image Upscaler Online

Only some people have access to top-tier editing software like Photoshop. If you're searching for an affordable and user-friendly solution to smoothen out grainy photos, Aiseesoft Image Upscaler Online is a great choice. This online tool leverages cutting-edge AI technology to address the grainy issue and significantly improve image quality with just a few easy steps. At the heart of the tool is its AI, crafted to detect and minimize noise in your photos, thereby lessening the grain's impact. In addition to noise reduction, Aiseesoft Image Upscaler enables you to increase the resolution of your photo. It boosts image clarity, potentially diminishing the graininess even more. Here are the steps on how to make photos less grainy in Aiseesoft!
Step 1.
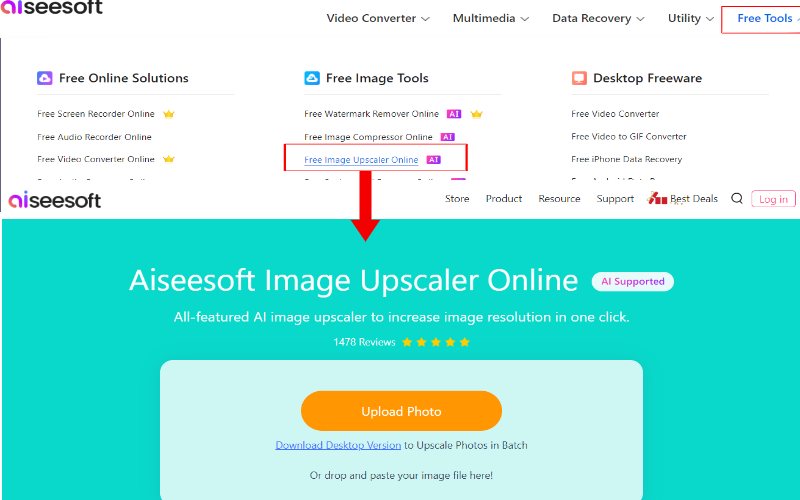
Launch your favored internet browser and go to the Aiseesoft website. Look for the Image Upscaler in the Free Tools section.
Launch Aiseesoft Image Upscalery
Step 2.
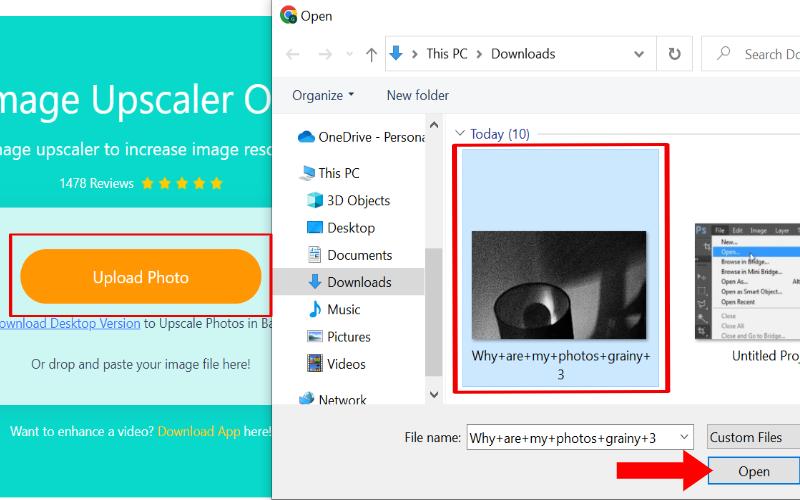
Locate and click the Upload Photo button in the center of the page. You can also move your picture to the specific space by sliding it across. Choose the grainy photo you wish to enhance from your computer's files.
Upload Grainy Photo
Step 3.
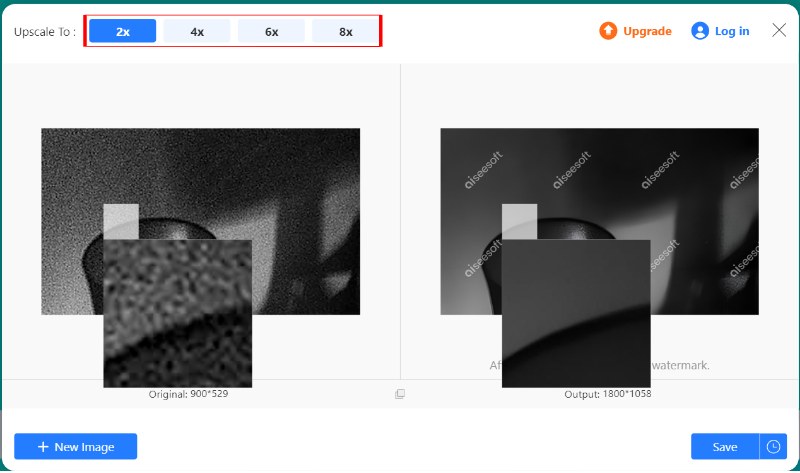
Below your uploaded photo, you will find options to upscale its resolution. Pick the magnification level you prefer, such as 2x, 4x, or 8x. Upscaling can enhance detail and lessen graininess, but higher magnification might introduce new artifacts. Begin with a moderate increase to observe the impact on your image.
Choose Magnification Level
Step 4.
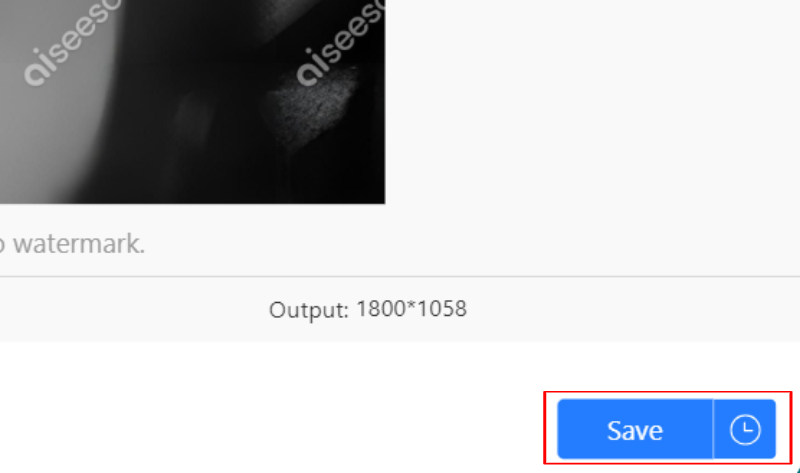
Click the Start button after setting your desired magnification level. Aiseesoft's AI noise reduction technology will begin processing your photo. A few seconds later, you can preview the enhanced version. If you're pleased with the results, select the download button to save the improved image to your computer.
Download New Photoy

Method 2. Fix Grainy Photos with Canva - AI Image Sharpener

Canva, a popular online design tool, has surprised its users with its new feature, the AI image sharpener, which helps fix blurry photos easily. This tool uses AI to enhance the quality of images within the Canva app, making it easier to work with design projects by allowing for direct editing of photos without the need to send them to other software. Similar to Aiseesoft's AI upscaler, the Canvas tool reduces noise and improves the image's resolution, making it look better. So here’s the guide on how to make a grainy picture clear.

Step 1.
Open your web browser and navigate to Canva. If you still need to create an account, creating a free one is quick and easy. Once you're logged in, choose Design Creation and select a template size suitable for your needs. Alternatively, if you'd rather start from scratch, select Start with a Blank Canvas.
Create Canva Design
Step 2.
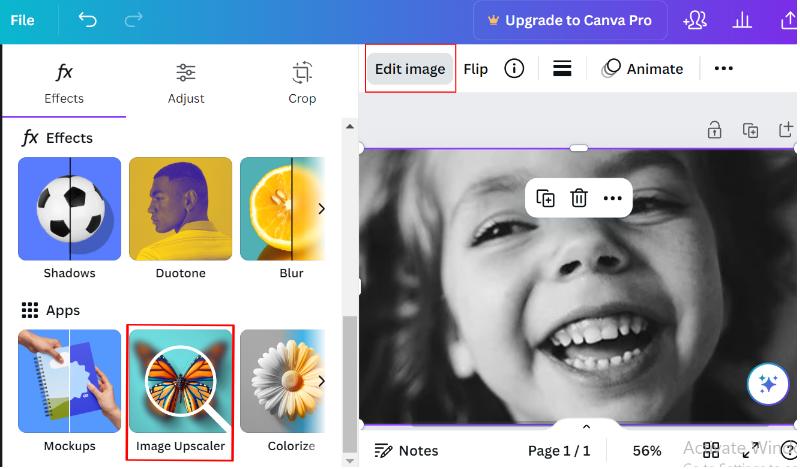
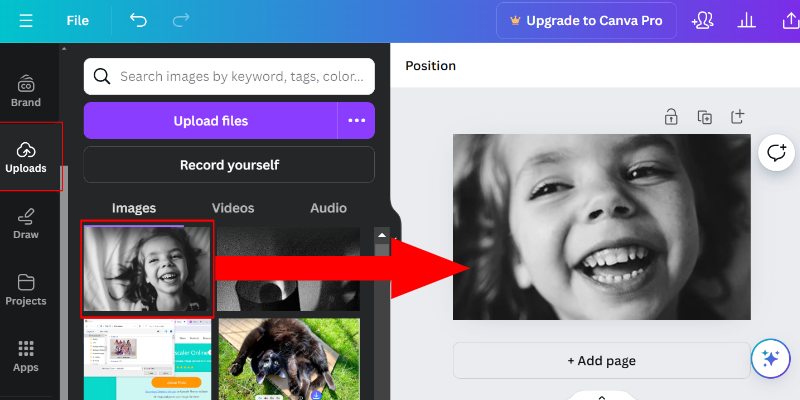
Select the Uploads option on the left sidebar and then choose the Upload Files button. Select the grainy photo you want to improve from your computer's files. Once your photo is uploaded and displayed on the editing canvas, click on it to select it.
Choose Photo to Upload
Step 3.
Look for the Edit image options above the canvas. Three dots or an Edit icon might represent it. Click on it. In the editing menu, locate the option labeled Enhance or AI Enhance (depending on your Canva version).
Select Image Upscaler
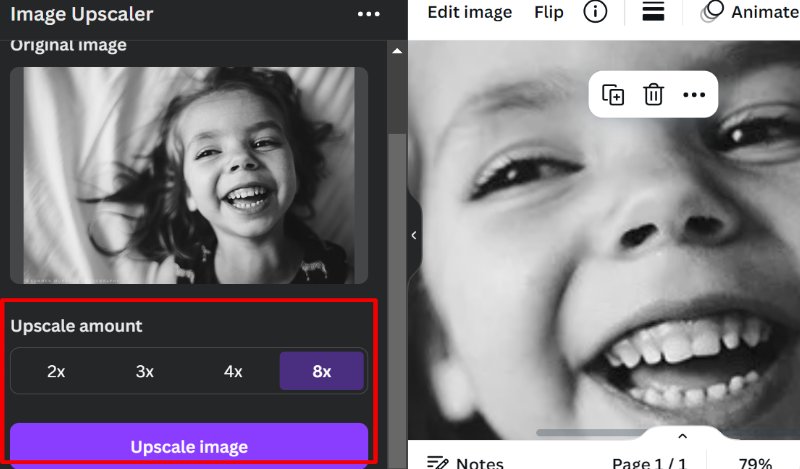
Step 4.
You will see buttons to increase the image resolution (e.g., 2x, 4x). Experiment with upscaling to see if it further reduces grain appearance, but be mindful of potential artifacts introduced at higher magnifications.
Pick Image Resolutiony
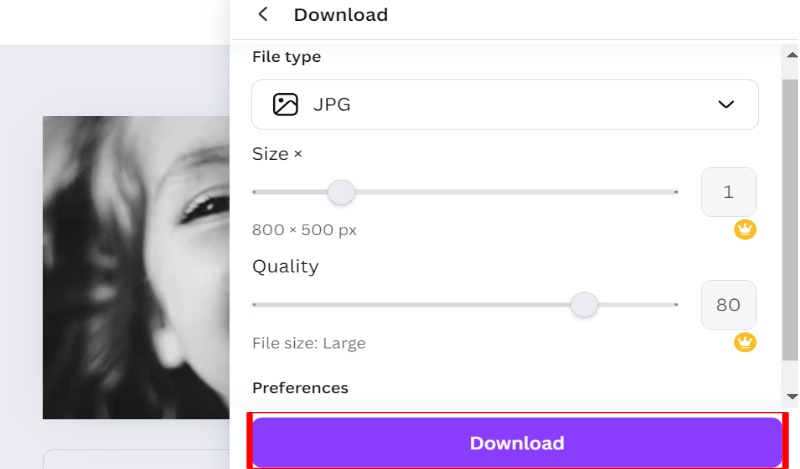
Step 5.
Once you are satisfied with the results, click the Download button at the top right corner. Choose your preferred file format (PNG or JPG) and download the improved image. Alternatively, you can use the enhanced image within your Canva creation if you are working on a design project.
Download Edited Image

Part 3. How to Make Photos Less Grainy on iPhone and Android

Method 1. How to Fix Grainy Photos in Lightroom on Android

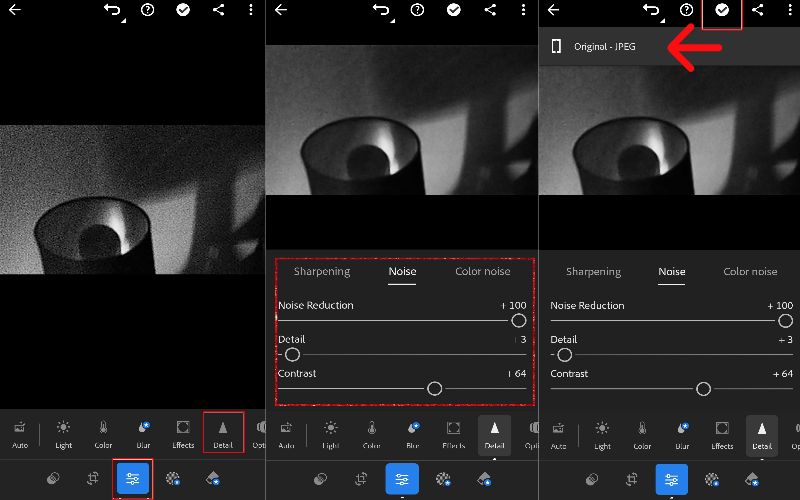
Ever had a photo look great on your phone but lose its quality when transferred to your computer? Adobe Lightroom Mobile, a free photo editing app for Android, solves this issue. You can also use Lightroom to improve photo quality. It's not just about filters; it offers advanced tools, especially a noise reduction function, for quick, on-phone editing. Lightroom Mobile is notable for its features, like free, essential tools, strong noise reduction, and easy-to-use interface. In this guide, we'll look at how to fix grainy photos in Lightroom to improve grainy photos to professional quality on your Android phone.
Step 1.
Launch Lightroom Mobile and open the image you wish to enhance. Navigate to the Edit tools, often indicated by sliders or icons. Within the edit options, locate the Detail panel, which may be labeled differently depending on your version.
Step 2.
You'll find sliders for Luminance and Color noise reduction in the Detail panel. Adjust the Luminance slider to diminish the overall graininess. If your photo contains colored specks, fine-tune the Color noise slider for precise control.
Step 3.
Once you're pleased with the noise reduction, click the checkmark or the Done button to save your modifications. Lightroom Mobile will create a new, enhanced version of your photo.
Fix Grainy Photo in Lightroome

Method 2. Make Your Images Clearer with Photos in iOS

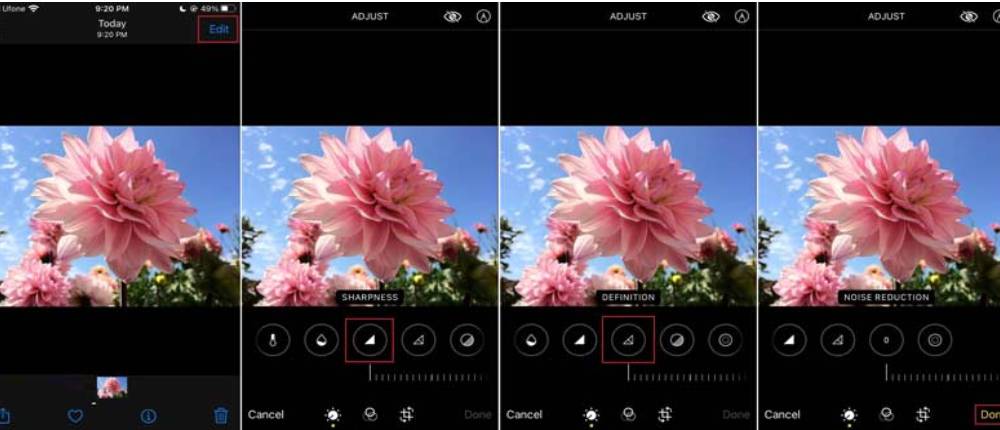
If you have trouble with grainy photos on your iPhone, the solution might be right in your pocket! The Photos app on iOS devices has basic but helpful editing tools, including noise reduction. You can use it to make a picture clear on iPhone easily. Choosing the Photos app to fix grainy photos is a good idea. You can use it right away since it's already on your iPhone. It has a simple tool for noise reduction that can make your photos clearer. It's easy to use on touchscreens. Here's how to fix grainy photos free in the Photos app!
Step 1.
Launch the Photos app and open the grainy photo you want to improve. Tap the Edit button (usually represented by three dots or editing icons).
Step 2.
Look for sliders or adjustment options within the editing menu. Locate a setting labeled Noise Reduction or something similar (the name might vary slightly depending on your iOS version). Slide the noise reduction adjustment to the right to reduce grain intensity.
Step 3.
Once you're happy with the reduced grain, tap Done or the equivalent button to save your edits. The Photos app will create a new version of your photo with improved clarity!
Edit Grainy in Photo

Part 4. FAQs on How to Fix Grainy Photos

Why do my iPhone photos look grainy when printed?

If your iPhone photos look grainy when printed, several factors could be to blame: Make sure the photo is clear and not too pixelated. Using high ISO levels can cause graininess, so keep it moderate. Check that the photo is clear enough for the intended print size. Begin with a clear and detailed photo. Opt for a top-notch printer and quality paper.

Why are my photos grainy?

Photo graininess, or noise, can be caused by making the camera more sensitive but often introducing grain, particularly in dim environments. The absence of fine details when enlarged can result in grain. Soft or inconsistent lighting can bring out noise. Used to decrease the file size can sometimes introduce noise. Decreased effective resolution can heighten the appearance of noise. Larger sensors tend to produce less noise. Too much editing can intensify the noise in an image.

What is grain?

The term grain describes the look or feel of small, visible particles or fragments within a photograph. It is usually seen as an unwelcome element of noise or blurriness. Grain usually presents as a series of minor dots or specks, which can result in the photograph seeming less refined and transparent. Grain is generally more prevalent in photographs taken with film but may also show up in digital photographs under specific circumstances.

Conclusion

Regardless of your level of technology skill or the tools you like to use, you now have a wide range of resources on how to make photos less grainy. You may be a Photoshop expert. Or, you may love editing photos on your phone. Or, you may prefer simple online options. This guide gives you the skills to get clear, noise-free photos. So, take on the challenge, preserve your memories, and forever say goodbye to the blur and noise!

What do you think of this post?

Excellent

Rating: 4.9 / 5 (based on 482 votes)Follow Us on

Disqus IconLeave your comment and join our discussion
AI Photo Editor box

Enlarge and upscale images up to 4K in batches quickly with wide support for various image formats.

Free DownloadFor Windows

Secure100% Secure. No Ads.

Free DownloadFor macOS

Secure100% Secure. No Ads.

Back to top