Here are some frequently reported questions about hard drive not showing up in Windows 10. Read and check if you encounter the same problem.
In conclusion, you cannot access the internal or external storage space in Windows 10. Things will be worse if your stored files are inaccessible. Fortunately, you can fix HDD not showing up in Windows 10 without data loss. Now, let's read together to see how to find the disappeared or not recognized hard drive in Windows 10.

• Loose or Damaged Cables
Check if the hard drive's cable to the motherboard is loose, damaged, or not well connected. If so, the hard drive may not be recognized by the system.
Check out if the USB or Type C is broken for external hard drives. Also, you can try a different port each time to resolve the issue.
• Drive Letter Conflict
Sometimes, a new or existing hard drive might not be assigned a drive letter. It will lead to recognition failure in File Explorer. This can be fixed by assigning a drive letter in Disk Management.
• Outdated or Corrupted Drivers
Outdated or corrupted drivers may remain bugs and instability. Updating or reinstalling drivers can often solve this problem.
• BIOS/UEFI Configuration
If the hard drive is disabled in the BIOS/UEFI settings, it will not be detected by the operating system. Enabling the drive in the BIOS/UEFI can solve this issue.
• Power Supply Issues
An insufficient power supply or connection for internal hard drives can prevent the drive from spinning up and being recognized.
• Physical Damage
If your hard drive was dropped or hit by something, the collision may cause the disk surface to be scratched.
First, check if your disk is well connected to the motherboard. Ensure your connection port from the disk and motherboard is not broken or loose. If the cable is fine, try to change to another new one to see if the problem remains.
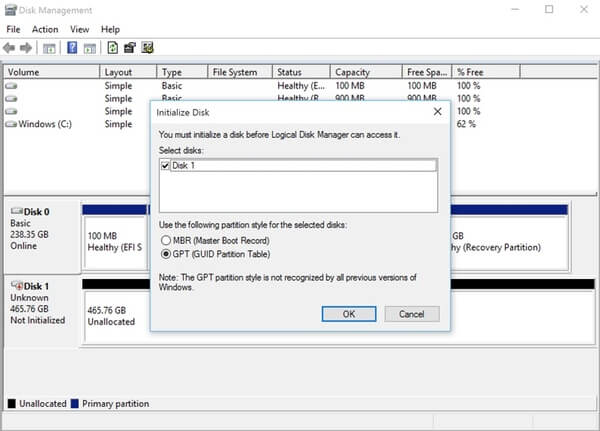
When your hard drive appears as unallocated space, or you cannot see the disk capacity, you should initialize the hard drive. Be aware that all stored files will be removed completely. So you had better create a backup before fixing the hard drive or partition not showing up in Windows 10.
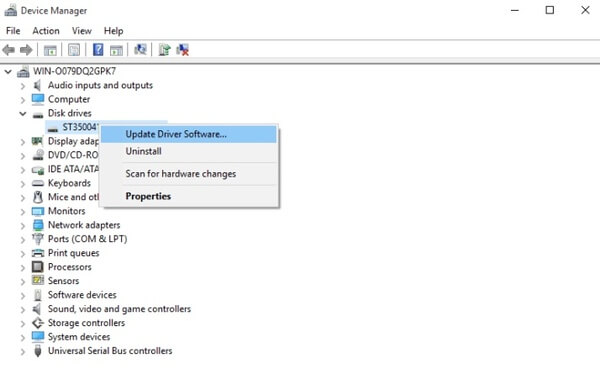
If your hard drive works well in the past, then the Windows 10 hard drive not showing up problem may be caused by the incompatible driver. In another word, you need to update driver software to the latest version.
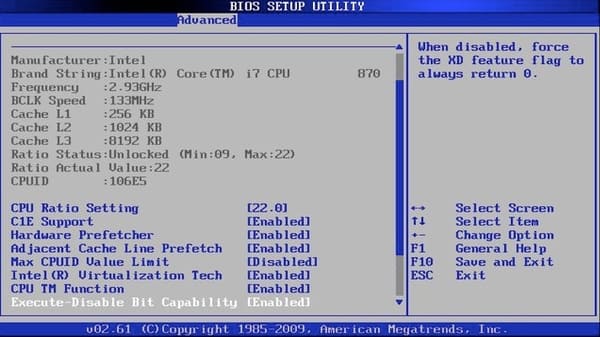
If your second hard drive not showing up in Windows 10 Disk Manager or BIOS, you need to reboot your computer and enter into the BIOS environment to have a try. Check if the hard drive is enabled in BIOS or not.
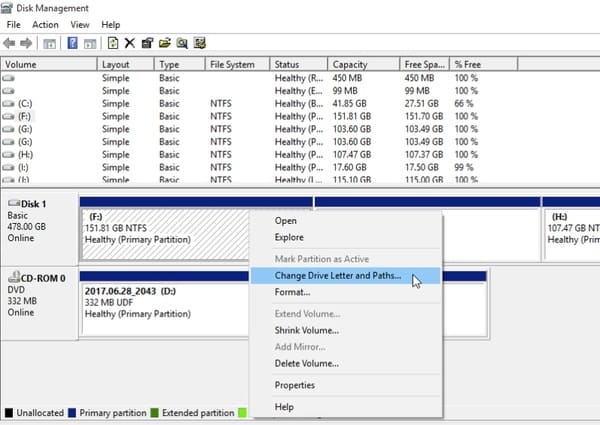
Check the connection between the external hard drive and your computer. If it is connected properly, you can give a drive letter to your invisible hard drive. Actually, when you fail to detect the new hard drive in Windows 10, you can try this method to solve the problem.
Sometimes, there might be file conflicts or logic errors in your disk. The best way to make it readable is to format your hard drive to NTFS. That will reset it to the factory status. But be aware that all the data inside will also be erased.
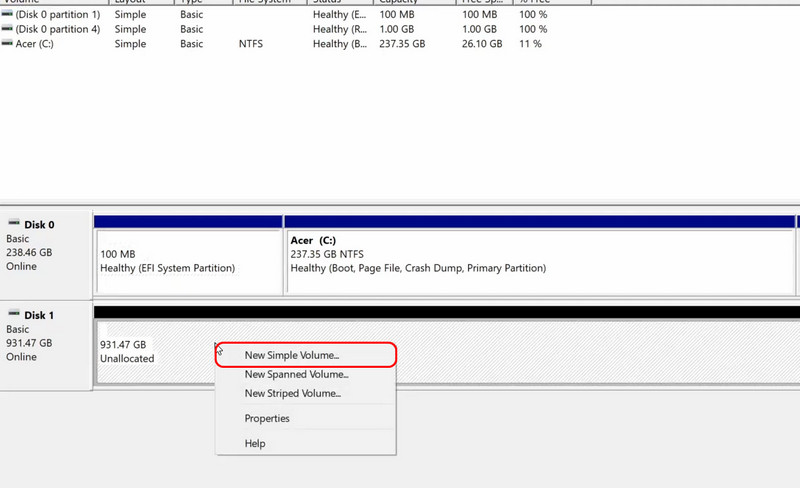
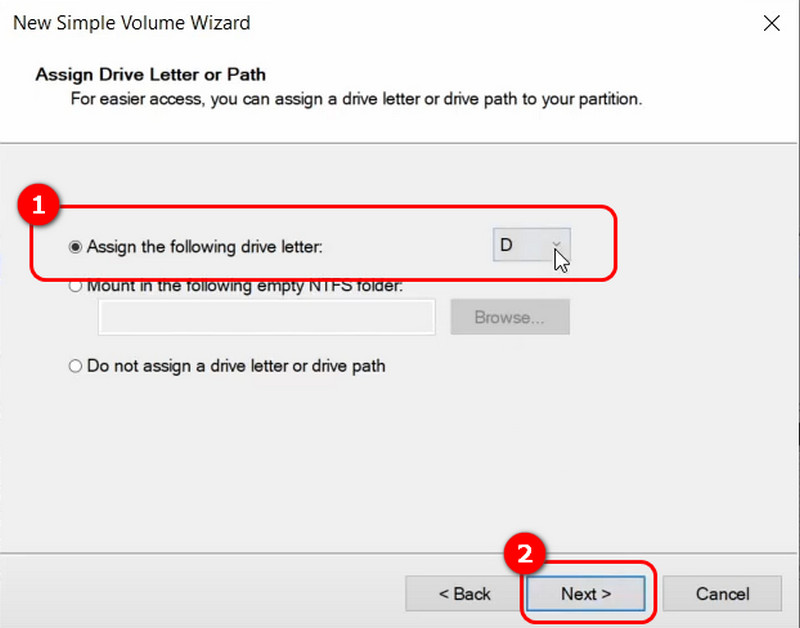
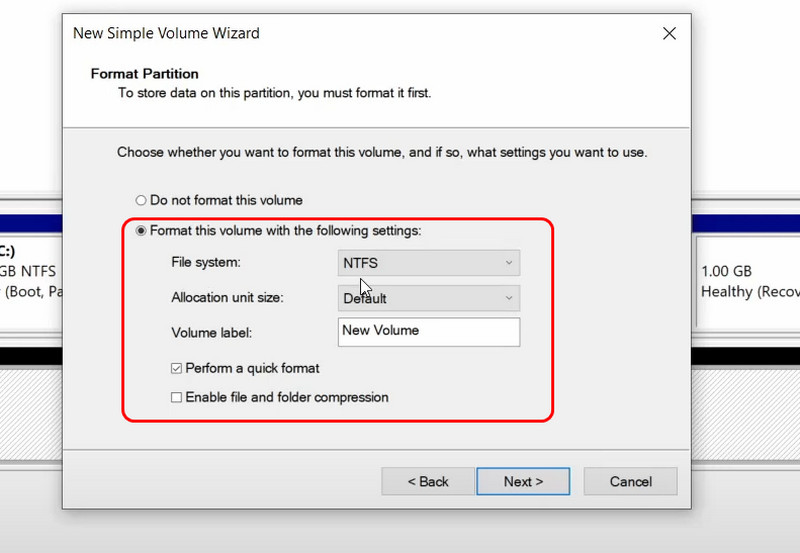
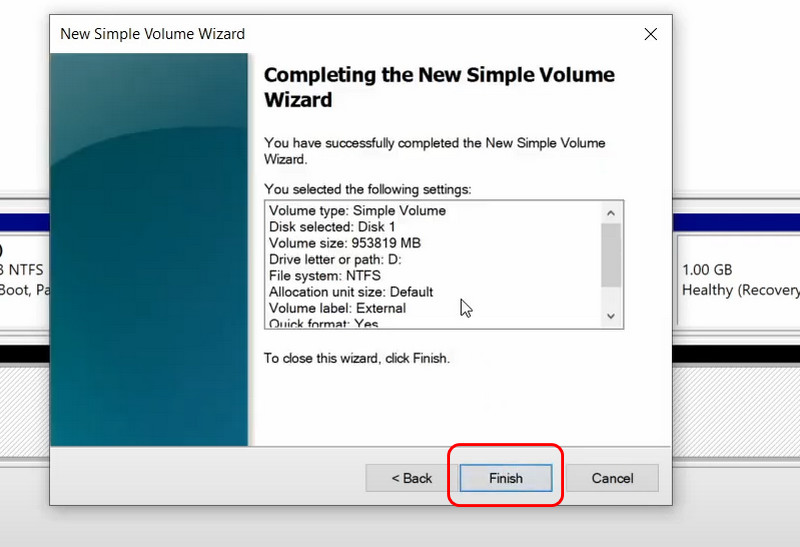
After all of these efforts, you should be able to see your disk has been formatted successfully.
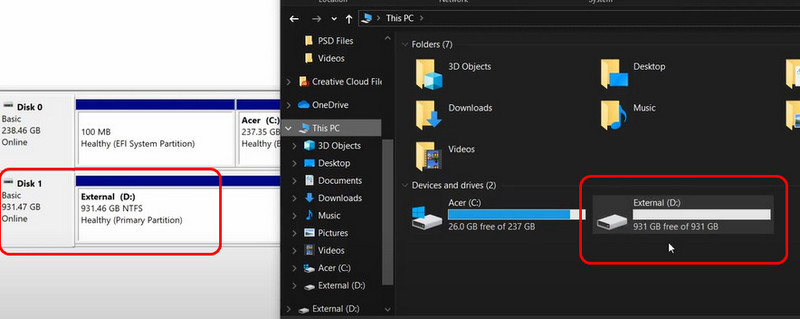
A new partition is needed if your disk has already been formatted but is still invisible in File Explorer. Also, we will provide a solution to restore your formatted data perfectly.
• Create New Partitions
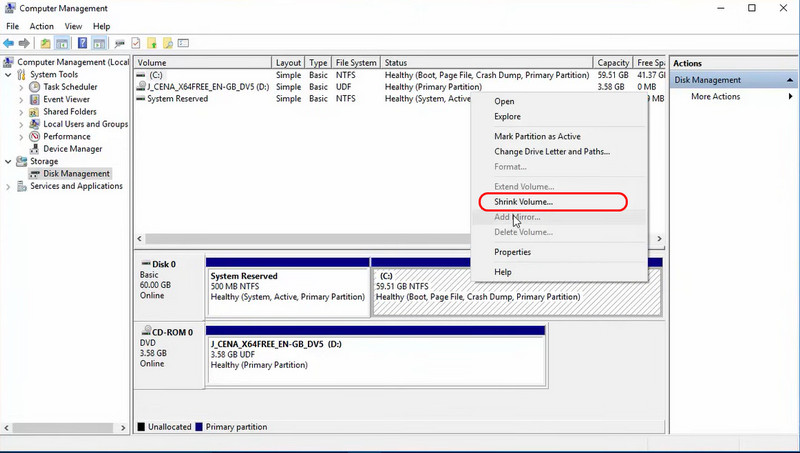
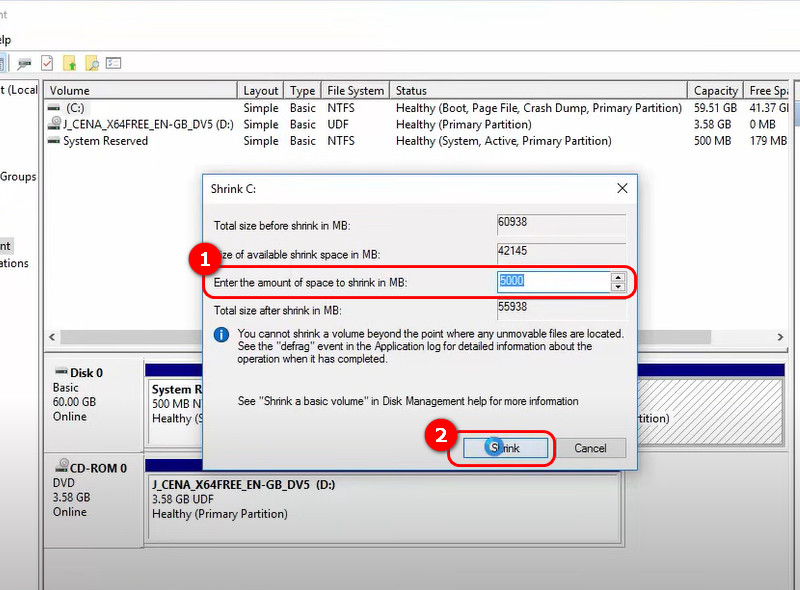
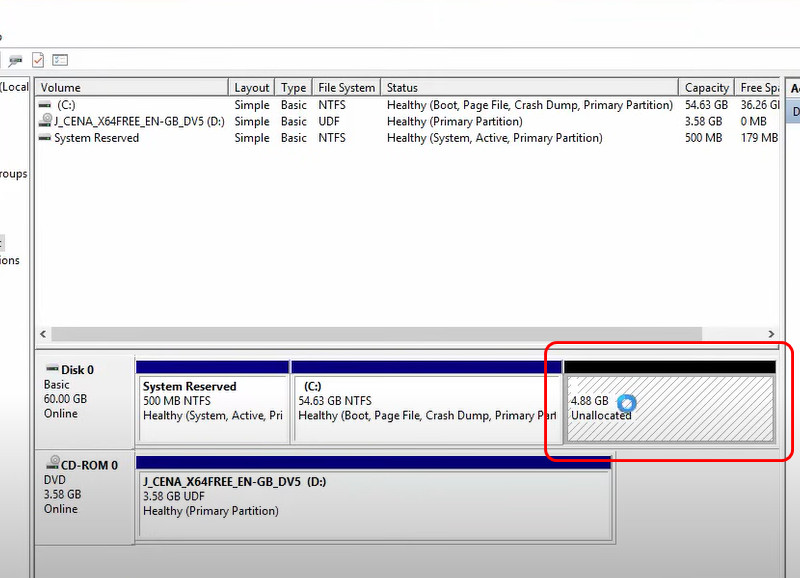
• Restore the Data from Formatting
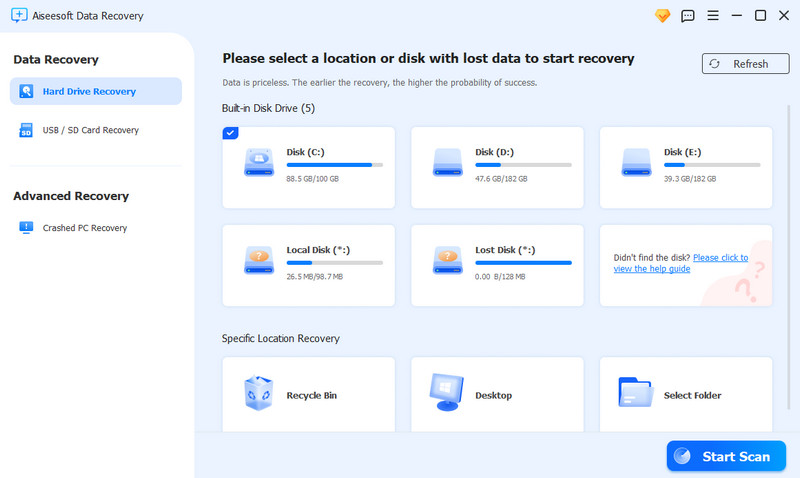
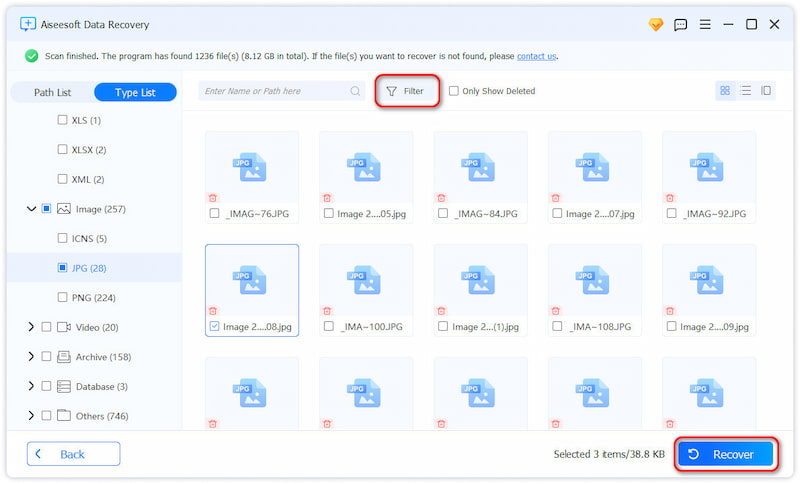
This solution will help you to recover your lost file on Windows due to the formatting. Here, we recommend you try Aiseesoft Data Recovery.
Aiseesoft Data Recovery is one of the best tools worldwide, providing a relatively fast speed while maintaining scanning depth. Also, it supports running on multiple devices, including PCs, laptops, external hard drives, flash drives, and memory cards. Meanwhile its file types support is also pretty wide, such as documents, photos, videos, emails, and more.
The straightforward UI and powerful scanning capabilities make it accessible for nonprofessional and experienced users. Additionally, Aiseesoft Data Recovery prioritizes user privacy and data security, guaranteeing that your restored data remains safe throughout the process.
100% Secure. No Ads.
100% Secure. No Ads.
Features
• Use deep and quick scans to improve efficiency
• Recover and fix your images with AI
• Support over 1000+ formats recovery
• Available on multiple devices like camera, PC, tablet, etc.
• Provide unique optimization on SD card recovery
Why is my hard drive not showing up in File Explorer?
This can be a lot of reasons, such as improper connections, outdated drivers, or file logic errors. Therefore, ensure your hard drive is connected correctly, and the driver is the newest version.
How can I check if my hard drive is detected in BIOS/UEFI?
Reboot your PC and press the F2, F10, or Delete key to enter the BIOS/UEFI. Next, look for the hard drive under the system configuration section to verify if it is detected.
What should I do if my hard drive is not recognized after a Windows update?
Sometimes, Windows updates can cause driver conflicts. You can try to uninstall the update patch or use the Device Manager and Disk Management tools to troubleshoot and resolve the issue. Also, you can try to stop Windows from updating to deal with it once and for all.
Conclusion
Today, we have shown you several methods to fix a hard drive not showing up in Windows 10, including changing drive letters and paths, formatting the disk, updating the driver, etc. I hope this tutorial helps you well. If you like this article, please share it with your friends, helping more people deal with their problems.

Aiseesoft Data Recovery is the best data recovery software to recover deleted/lost photos, documents, emails, audio, videos, etc. from your PC/Mac.
100% Secure. No Ads.
100% Secure. No Ads.