You probably notice that your DVDs look well on an old TV. However, when it comes to play on smart TVs or 4K devices, DVDs look pretty poor. In such situations, you will need to upscale DVDs to higher resolution and better fit newer screens. That is not a simple task and you have to pick the right tool. Otherwise, it will damage your DVD videos.
This tutorial will tell you the basic knowledge about DVD upscaling, such as what tool you should use, how to upscale DVDs to enjoy on advanced devices, such as smart TVs or 4K TVs, to get the best audiovisual experiences.

DVD Upscaling

At beginning, the DVDs support a native video resolution of 720×480, also known as 480i. It means that your DVD player read off the disc in 480i resolution. In result, DVD is classified as a standard resolution format.
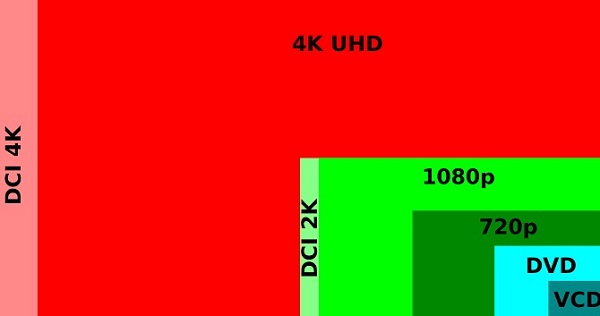
This was fine when the DVD format released in 1997. However, as technology developing, 480i only works well on compatible TVs. With the introduction of HDTV, smart TV and 4K Ultra HD TV, we can enjoy videos in 720P, 1080p and even 2160p or 4K.
480i represents 720 pixels horizontally and 480 pixels vertically displayed across a screen, while 1080p means 1,080 horizontal lines displayed sequentially. There is much differences to the eye of the average audiences between 480i and 1080p.
The DVD upscaling process, sometimes known as up-conversion, will match the upscaled pixel of your advanced screen and convert DVD to Blu-ray level.
When upscaling DVD, you have more than one options. First of all, there are some upscaling DVD players, such as Sony DVPSR510H, Samsung DVD-C500, Sylvania SDVD1096, Panasonic DVD S700, and more, which have the capacity to match the native DVD resolution of an HDTV.
If you just have a standard DVD player along with an HDTV, the Component video connection could upgrade the resolution of your DVD as well.
The third option is to upscale your DVDs with a professional software.
If you want to enjoy your old DVDs on any devices with the best quality, Aiseesoft Video Converter Ultimate could meet your need. Before getting started, let's talk about what the DVD upscaling software can do.
1. Rip digital videos from any DVDs or Blu-ray discs with one click.
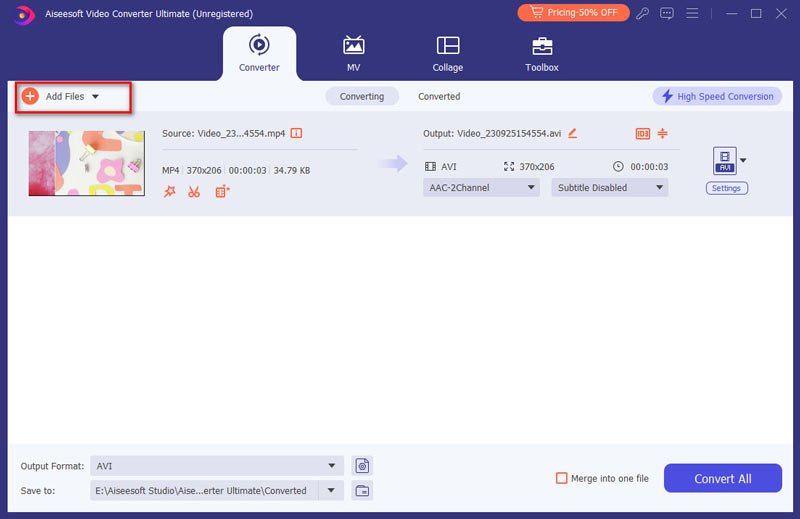
2. Convert DVDs to lossless video formats, such as AVI, MKV, and more.
3. Upscale video resolution to 1080p and 4K using the advanced algorithm.
4. Utilize hardware acceleration technology to process multiple videos simultaneously and quickly.
5. Offer extensive video editing tools and custom options to get the desired effect.
Apparently, Video Converter Ultimate is the best DVD upscaling software you can find on market.
Step 1 Import DVD videos into the best DVD upscaling software
Download and install Video Converter Ultimate on your PC. There is another version for Mac. Insert the old DVD into your DVD drive and start the DVD upscaling software. Click the Load Disc button to import the DVD into the software. Then the DVD videos will appear in the media library area.

Step 2 Upscale the DVD videos
The DVD upscaling software provides multiple ways to enhance your DVD video quality:
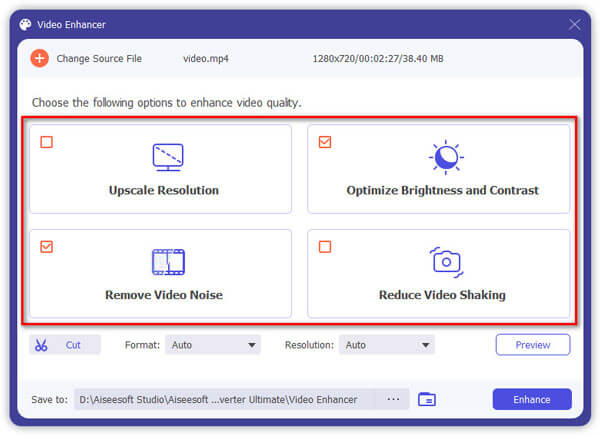
Firstly, select a DVD video and click the Enhance button on the top ribbon to open the Video Enhancer window. Then check the box next to the Upscale resolution option. It is able to produce superb video quality when upscale DVD resolution. Moreover, you can use Optimize brightness and contrast, Remove video noise and Reduce video shaking to process the videos until you get the perfect result. When enhancing is done, click the Apply button to confirm it. If you are upscaling multiple videos at one time, click the Apply to All button.

Secondly, check all DVD videos and go to the bottom area. Click and expand the Profile dropdown list, head to the 4K Video or the HD Video tab and select a proper format, such as MP4. Then hit the Browse button and choose a folder as the destination.
In this way, you are able to play DVD disc on your laptop, mobile phone, etc. even without DVD drive or player.

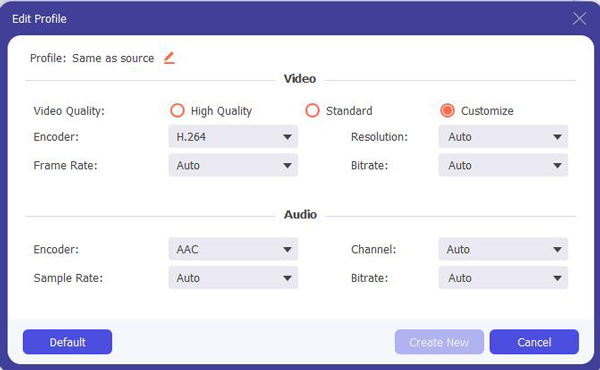
If you want to enhance the DVD video resolution further, click the Settings button to open the Profile Settings dialog. Then modify the video resolution from the Resolution dropdown list under the Video Settings section. Next, click OK to confirm the changes and go back to the home interface.

Step 3 Preview and export upscaled DVD videos quickly
Select a processed video in the library area and hit the Play icon on the built-in media player to preview it before outputting. Make sure that all DVD videos are perfect and click the Convert button to start exporting the upscaled DVD videos to your hard drive.
Note: According to our test, Video Converter Ultimate only spends a few seconds to process all videos on a standard DVD. However, it may take a while to output 4K or HD videos depending on your hardware.
Around DVD upscaling, there are some tracks:
1.First of all, you should understand that the DVD videos upscaled to 4K are different with the 4K movies. The DVD upscaling process cannot add more detail than it is already present. Your video editor just guesses it. That is why Blu-rays will not be pointless. That is why you need to use a professional DVD upscaling software, such as Aiseesoft Video Converter Ultimate.
2.Almost all DVD player is able to be connected to an HDTV, but only upscaling DVD players could match the native pixel resolution of an HDTV. If you do not have an upscaling DVD player, you will need a DVD upscaling program.
Conclusion
This post told you how to perform DVD upscaling. For movie enthusiasts, HD videos are important to get excellent audiovisual experiences. Blu-ray discs are expensive and requires dedicated disc players. On the other hand, standard DVDs could provide similar quality with Blu-ray if you have a DVD upscaling application, Aiseesoft Video Converter Ultimate. We hope that our recommendations are helpful to you.