How to cut video in Movie Maker? It should be not a difficult question, but lots of users might not easily find a suitable movie making software or the procedure to cut videos. Certainly, it is universally known that film-editing tool is able to simply and easily cut some of videos and photos you need to author them into some audio clips or do something else according to your requirements in a straightforward manner.
The article lists two frequently used movie makers to cut video clips, Windows Movie Maker and Video Converter Ultimate. You can also get the detail procedures to achieve the result with ease.

Cut Video in Movie Maker
With regard to how to cut video in Movie Maker, the first method we recommend is using Window Movie Maker. It is a simple and powerful video authoring and editing software, which designed for the latest versions of Windows 7, Windows 8 and Windows 10. Indeed, it is the most efficient program that have helped thousands of window owners work out how to cut video in Movie Maker successfully. Its key features include:
Add captions and notes, music and dubbing as well as video effects
Timeline adjustments and automatic video production
The new effects and animations can be added and modified at any time
Cutting video without losing video quality
As a free video editing tool, Windows Movie Maker will enable you to understand how to cut video in moviemaker through several simple steps. Now, just follow the steps below to cut video with ease.
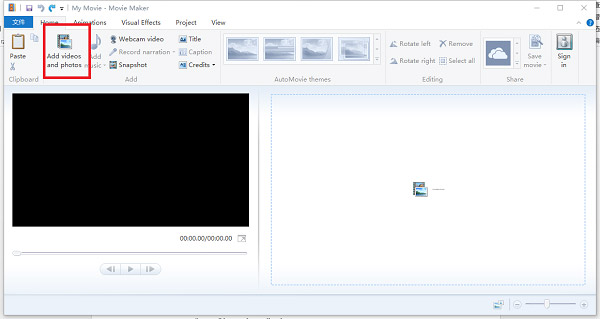
Step 1 Run Window Movie Maker and add video
Above all, boot up the Window Movie Maker on your computer. And then locate to top area and click the option of "Add Videos and Photos" to choose the videos you want to edit. In this step of how to cut video in movie maker, you should note that this software you open is suitable for your computer system.
Step 2 Play the video clip
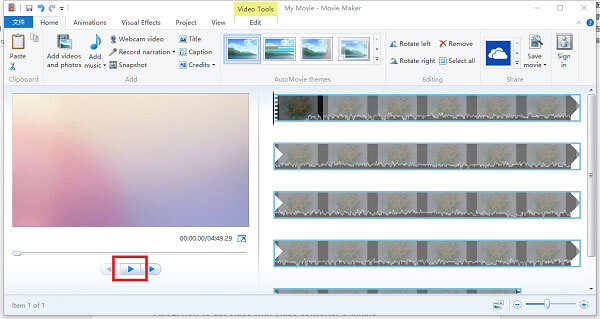
After the video is selected, it will appear on the left side of the interface, and on the right side of the interface, the frame-by-frame view will be shown. Just press the "Play" icon on the left side to play this video.
Step 3 Set start point
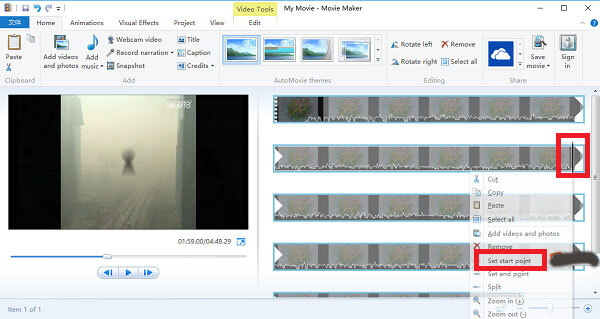
And when the video plays to the point where you need to start cutting, please hit the button of "Pause" to continue the operations of how to cut video in movie maker. After that, place the mouse on the black vertical line which locate on the right of the screen, and then click the right mouse button to select the icon of "Set Start Point".
Step 4 Set end point
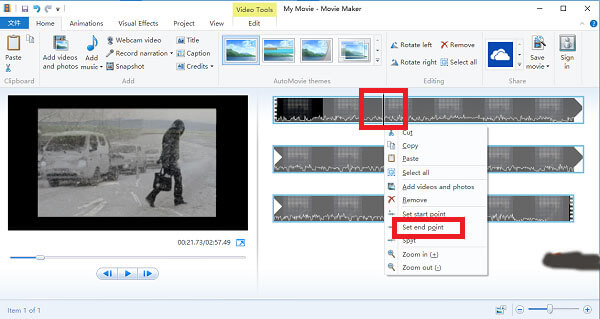
Once you have set the start point, click the "Play" button to continue playing the video. When the video is played to the end of the video you want to cutting, just repeat the operation of step3 and press the "Set End Point" button.
Step 5 Save the video you just cut
It is the last step in how to cut video in movie maker. You should hit the "Play" icon to check the clip's video is complete or not. After confirmation, click the option of "Save movies" to save the video you have just cut. This icon is located on the top of interface.
Aiseesoft Video Converter Ultimate should be another excellent moviemaker to cut video clips. It is an ultimate video conversion tool, which provides a complete set of video editing functions, such as download, adjust, transform and edit.
1. Convert video and even 4K videos to more than 100 formats.
2. Download video from online streaming sites to computer.
3. Add great video effects to the video clips.
4. Add external subtitles, audio tracks and more.
5. Basic video editing functions, such as cut videos.
6. Enhance video and remove video noise.
Step 1 Download and install this software
First of all, Download Aiseesoft Video Converter Ultimate from the official website, and then install this software on your PC. After that launch the program to cut videos within the moviemaker.
Step 2 Add the video you need to cut
Once you open Aiseesoft Video Converter Ultimate. You can click the icon of "Add files" to choose the video you want to edit. You can also drag and drop the video clips into the program that you need to cut.

Step 3 Choose the Clip option
Next, press the option of "Clip" on the top of interface. And then hit the "Play" icon to play the video and choose the video clip you want to intercept. Make sure the video is playback on the program.
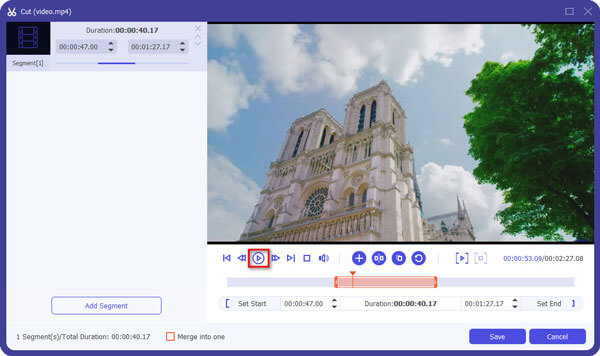
Step 4 Set Start point & End point
When the video is playing to the beginning of the clip you want to intercept, click the "Pause" button and then press the "Set start point" button. Then, repeat the same operation to select "Set end point" button and click the option of "OK".
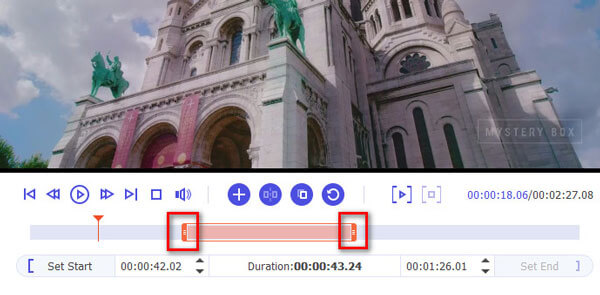
Step 5 Save the video
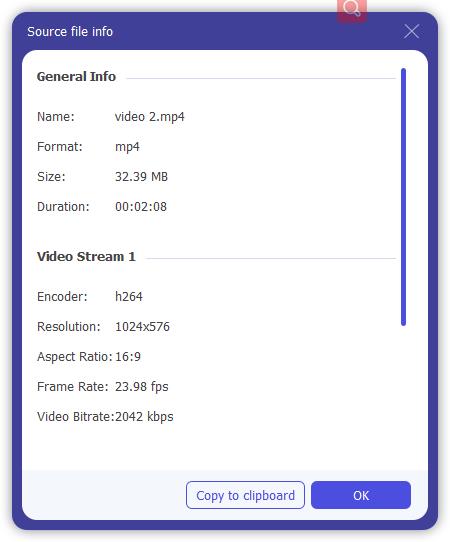
Finally, right-click on the video clip and choose the "Properties" button. And then a screen will appear, just press the option of "Export". Now, all steps about how to cut video in movie maker are fully completed and the video clip is also cut perfectly.
Based on the instructions above, you might understand how to cut video in movie maker on Windows. If you want to cut videos, just download and launch Window Movie Maker or Video Converter Ultimate and operate them according to the steps we have explained. In a word, hope this article can help you really grasp how to cut video in movie maker when you need it. If you have other questions or problems, please find the more detail about the information in the comments.