Summary
This post shows you two RAID recovery software (free and paid) to direct you how to recover data and configuration parameters on RAID 0, 1, 3, 4, 5, 6, 1E, 5E, 5EE, 10, 50, 60, and more.
Summary
This post shows you two RAID recovery software (free and paid) to direct you how to recover data and configuration parameters on RAID 0, 1, 3, 4, 5, 6, 1E, 5E, 5EE, 10, 50, 60, and more.
RAID provides a good performance for computer users, especially the server users. However, no one can predict the data loss from a RAID, and if it did happen, it will be catastrophic.

Raid Recovery
If you are unfortunate to suffer from a RAID array failure and data loss, this post will benefit you a lot.
2 solutions in this page are given to you to get the RAID recovery of data and configuration parameters.
RAID, short for Redundant Array of Independent Disks, originally Redundant Array of Inexpensive Disks, is a data storage virtualization technology that combines multiple physical disk drive components into one or more logical units for the purposes of data redundancy, performance improvement, or both.
RAID has different levels, and the standard RAID levels comprise a basic set of RAID (redundant array of independent disks) configurations that employ the techniques of striping, mirroring, or parity to create large reliable data stores from multiple general-purpose computer hard disk drives (HDDs).
RAID 0 splits data evenly across two or more disks, without parity information, redundancy, or fault tolerance.
RAID 1 consists of an exact copy (or mirror) of a set of data on two or more disks; a classic RAID 1 mirrored pair contains two disks.
AID 2, rarely used in practice, stripes data at the bit (rather than block) level, and uses a Hamming code for error correction.
RAID 3, rarely used in practice, consists of byte-level striping with a dedicated parity disk.
RAID 4 consists of block-level striping with a dedicated parity disk.
RAID 5 consists of block-level striping with distributed parity.
RAID 6 extends RAID 5 by adding another parity block.
The above description about RAID is from Wikipedia.
For getting the files recovery from RAID, you need the third-party software, Data Recovery to do you a favor.
Let's see why it is powerful to get RAID data recovery:
Now, let's move the step guide to recover data from RAID.
1 Free download, install and run this software on your computer.
2 Scan RAID data
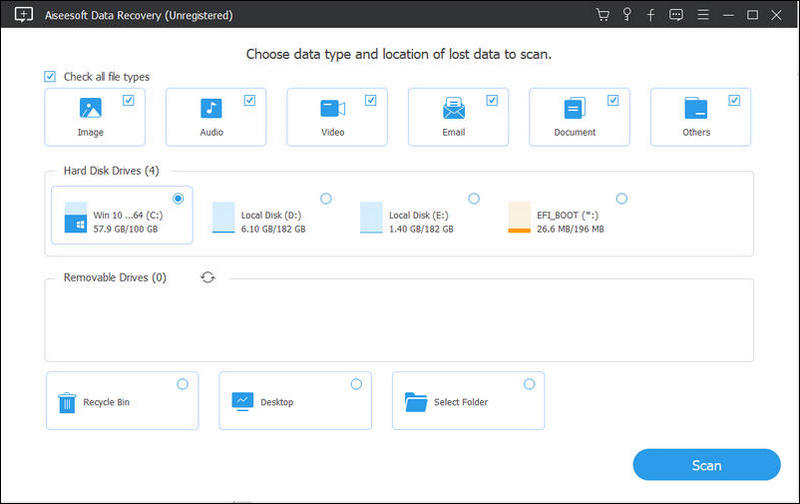
After running this program, you need to select the data type and hard drive for scanning in the main interface.
For the file type, you can find image, audio, video, Email, document and others. Tick the data types that you want to recover.
For the hard disk drive, just checkmark the drive where you want to extract the files.
Then click "Scan" to start to scan the formatted drive.

3Recover data from RAID
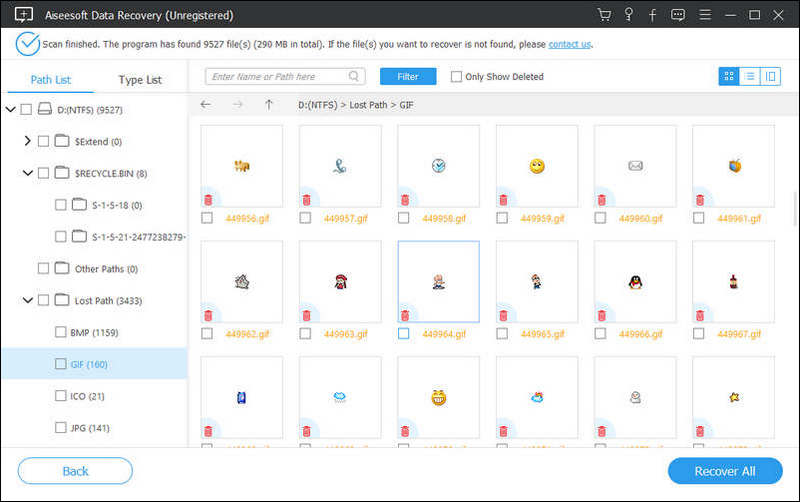
After the scan is complete, you can find all the files categorized by data type. Select the data type, and click the folder to see all the files. For viewing the data details, you need to choose and click "Recover" to save the data from RAID to computer.

Tips
1. When you click the "Scan" button, this software will start a quick scan for your computer. If you cannot find the data you want, you can perform a "Deep Scan" to scan your drive. Surely, it will take more time to get the scanning result.
2. The scanning result can be shown in the data type list and path list.
3. For getting a stable and complete recovery, you should save the recovery files in which is not the original scanning drive.
Check the video tutorial to get the RAID data recovery.


ReclaiMe Free RAID Recovery is designed for recovering configuration parameters like disk order, block size, start offset and others.
ReclaiMe Free RAID Recovery performs the recovery of RAID 0, 5, 5E, 6 and 10 on hardware/software RAID and NAS.
Tip
1. ReclaiMe Free RAID Recovery doesn't work with a single hard drive.
2. ReclaiMe Free RAID Recovery is compatible with Windows 7 and up.
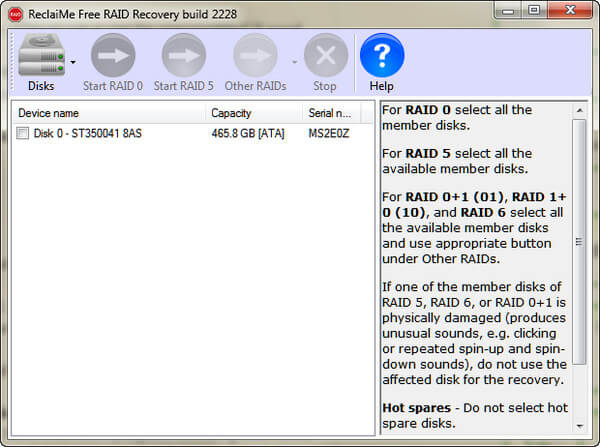
1 Download ReclaiMe Free RAID Recovery (http://www.freeraidrecovery.com/download.aspx), install and launch this software on your computer.
2 Decide on the type of your array.
For RAID 0, you need to select a minimum of two devices from the list and click Start RAID 0.
For RAID 5, you have to select all the available member disks and click Start RAID 5. Minimum of two disks is required.
For RAID 0+1, 1+0, RAID 5E or RAID 6, you should select all the available member disks and pick the appropriate RAID type under Other RAIDs.

3 Wait until the program finishes detecting the parameters patiently. It may take minutes to several hours.
4 After all the parameters have been already restored, you can select:
Run ReclaiMe to recover data. You are offered ReclaiMe File Recovery software (paid) to download and display the partitions on the array.
Save layout to the XML file. Save the recovered array parameters to the file in XML format.
Use with other data recovery software. Transfer the recovered parameters to certain well-known data recovery tools.
In this page, we have shared two ways to help you get the RAID data recovery and configuration parameters' retrieval. No professional skills are required, and you can fix the problem by yourself.
Very easy, right?
If any questions, just leave your comments below, and we will answer you ASAP.