QuickTime, the default media player on Macs, is a versatile tool for playing videos and basic editing. While you can't use QuickTime to crop videos, you can achieve similar results using the trim feature or explore alternative solutions. This article explores both approaches to help you refine your video content.

While QuickTime excels at basic video playback and editing tasks like trimming and splitting, it lacks a dedicated cropping tool. That means you can't directly select an area within the video frame and remove the surrounding parts. QuickTime Pro, a paid version that's no longer actively supported by Apple, offered some workarounds involving masks, but these methods are not readily accessible for most users.
Cropping and trimming are video editing techniques that often get confused. Cropping means removing unwanted areas from the frame. It essentially resizes the video and focuses on a specific region within it. Trimming refers to deleting unwanted sections from the beginning or end of a video, effectively shortening its duration.
Trimming allows you to remove unwanted sections from the edges of your video, effectively achieving a similar visual effect. Here is how to trim a video in QuickTime.
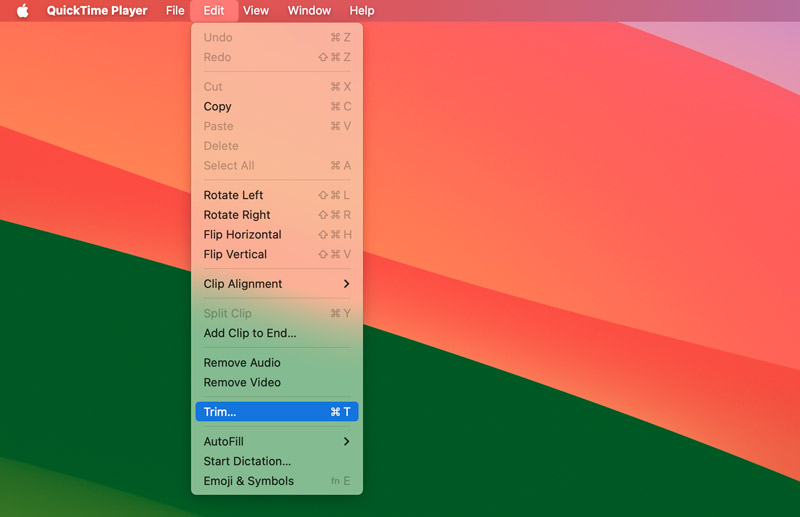
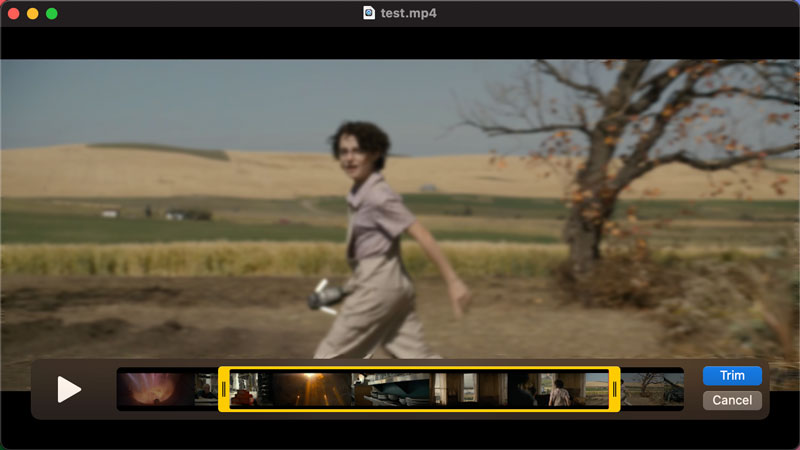
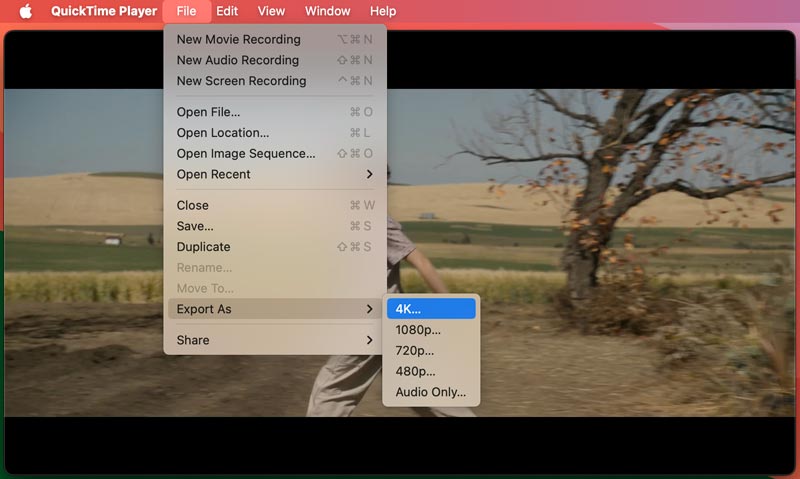
While QuickTime trimming offers a basic solution, it has limitations. You cannot change the video's aspect ratio or remove unwanted areas within the frame. If you need precise cropping capabilities beyond trimming, here are some effective alternatives.
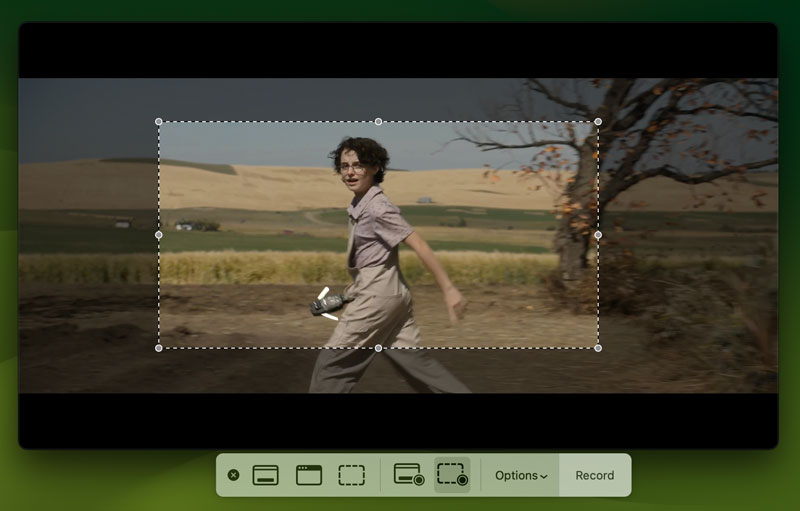
QuickTime gives a quick and easy workaround if you only need a basic crop. Open QuickTime and play your video. Open the Screenshot tool (Shift + Command + 5) and select Record Entire Screen. Click and drag to select the area you want to capture (essentially cropping the video). Then, click Record to capture the selected screen area while the video plays. You will end up with a recording of the cropped video content.
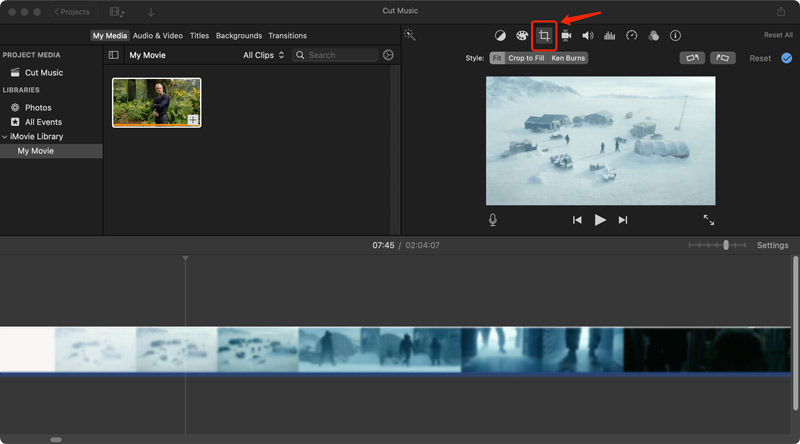
Apple's built-in video editing app, iMovie, offers a user-friendly interface for cropping videos. Import your video into iMovie. Drag the video clip to the timeline. Click the Crop button (looks like a rectangle with diagonal lines) located above the viewer window. Adjust the cropping handles to define your desired area. Export the cropped video.
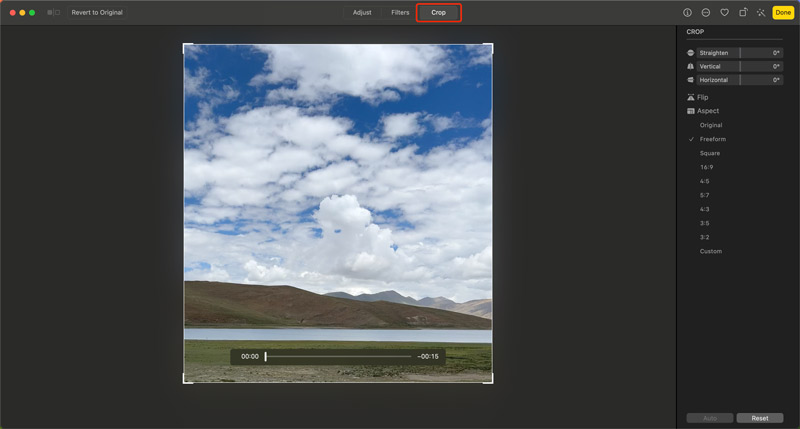
The Photos app allows basic video cropping. Open your video in the Photos app, click Edit, and then the Crop button. You can then drag the corners and sides of the crop rectangle to define the area you want to keep.
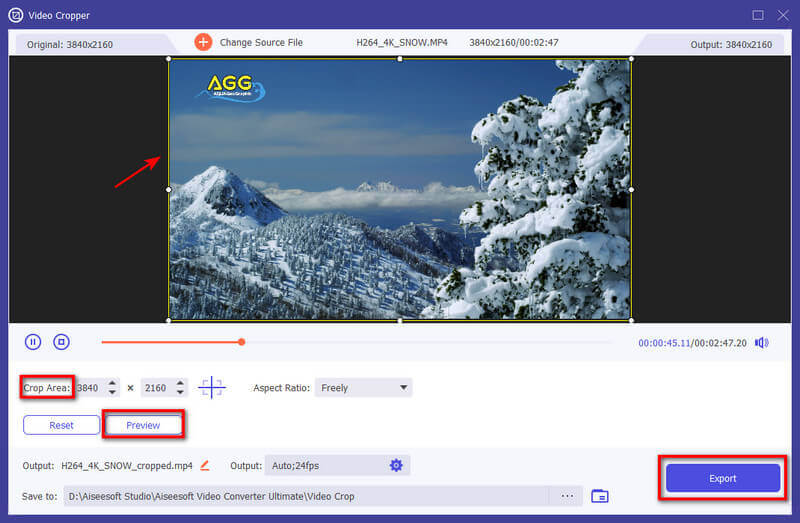
Numerous paid and free video editing software options offer advanced cropping functionalities. Popular options include Aiseesoft Video Converter Ultimate, Adobe Premiere Pro, Final Cut Pro, HitFilm Express, DaVinci Resolve (free version with limitations), and Kapwing. These applications provide precise cropping tools, allowing you to select specific areas within the frame and adjust the crop dimensions freely.
100% Secure. No Ads.
100% Secure. No Ads.
When cropping, keep the final video format in mind. Some social media platforms have specific aspect ratio requirements. Cropping your video beforehand ensures it fits the desired format without distortion. If you plan on cropping and editing your video extensively, consider starting with high-quality source footage in this video cropper. That minimizes quality loss during the editing process.
How We Test & Review
All our reviews and products are written and selected by humans. When we are reviewing the products or apps, we take our users' perspectives, values, experiences, and use cases into consideration.
Our writers would spend hundreds of hours testing the product themselves and be sure to provide unique insights into all their features. We guarantee that all selected apps/products are carefully and well-reviewed, including tests on how they would perform on different systems, how well they can handle multiple tasks, what file types they support, and how much time they need to complete one task. For paid products, we try our best to explore all the available features in free trials to help you decide whether to go ahead with the purchases.
In the end, we cross-check the test results and make sure the readers get the very finest reviews and manual-pick lists of top products.
Can QuickTime resize a video?
No, QuickTime cannot directly resize a video in terms of changing its dimensions. That means it can't alter the overall frame size of the video.
Is there an alternative to QuickTime on a Mac?
There are several alternatives to QuickTime on Mac for both video playback and editing purposes. You can use VLC Media Player, IINA, or MPlayerX to play various media files on your Mac. For video editing, you can turn to iMovie, the Photos app, or third-party video editing software like Aiseesoft Video Converter Ultimate, DaVinci Resolve, or Final Cut Pro.
Is QuickTime the same as MOV?
No, QuickTime and MOV are not exactly the same, although they are closely related. QuickTime is a media player application developed by Apple. It is pre-installed on Macs and allows you to play various video and audio formats. MOV stands for QuickTime File Format. It is a specific type of container format used to store video and audio data. MOV files are often opened with QuickTime by default because they are designed for the QuickTime framework on Macs.
Conclusion
While QuickTime doesn't offer a direct cropping function, you can get similar results using the built-in trimming feature. This article explores the limitations of QuickTime for cropping and dives into alternative solutions for precise video cropping on your Mac and Windows PC.

Video Converter Ultimate is excellent video converter, editor and enhancer to convert, enhance and edit videos and music in 1000 formats and more.
100% Secure. No Ads.
100% Secure. No Ads.