"iPhone won't sync music with iTunes. I upgrade iTunes to its latest version, but it still can't sync music or playlist to my iPhone 5s. Did I make something wrong?"
"iTunes will sync my iPhone photos to Mac when I connect my iPhone 6 to Mac. But now, it does not give the pop-up interface, and won't sync my iPhone photos with Mac. Any help?"

Considering the closure of iOS system, it will take some efforts to sync iPhone compared with Android phone. Even though iTunes is a free and powerful tool to help you sync music, playlist and calendar to iPhone, and Mac will also allows you to sync iPhone photos, you may access some errors while using them. Have you ever faced the situation that iPhone won't sync? When these tools fail to sync your iPhone, how do you deal with that? This page will show the solutions to fix iPhone won't sync.
When you get the "iPhone won't sync" issue, the problem is more likely caused by the USB cable. When you plug your iPhone into your computer wirh a right kind of cable, iTunes will recognize your iPhone in a minute or two. If nothing happens, the trouble could be your computer or the iPhone itself. In this part, there are two situations that iPhone won't sync to iTunes and iTunes won't sync music/playlist/calendar to your iPhone.
For solving this problem, you could follow the common steps to check if your iTunes or hardware damage:
◆ Reconnect your iPhone to computer
As the first trying, you should reconnect your iPhone with computer with another USB cable.
◆ Uninstall and update and reinstall iTunes
Sometimes, just updating iTunes to the newest version is enough to resolve all syncing problems, especially when you hasn't been updated iTunes in a while. In that case, you can uninstall iTunes and then download and reinstall its latest version on your computer. After that, you can connect your iPhone to computer to check if the issue is still exist.
◆ Restart your iPhone and computer
Surely, restarting iPhone, iPad or iPod and PC could be an effective way to solve iPhone won't sync problem. To do this, you can press and hold down the "Power" button and "Home" button at the same time until the device restarts. In many cases, this kind of hard reset could bring your iOS device to the normal condition.
◆ Wireless Syncing Method
If you can't use iTunes to transfer files between iPhone and computer, you can use wireless syncing. Wireless syncing could be an alterantive method when iTunes dose not sync your iPhone via USB cable. To do that, you can tap "Setting" > "General" > "iTunes Wi-Fi Sync" > "Sync now".
◆ Follow correct steps to sync iPhone
Make sure you did the correct steps to sync iPhone with iTunes. For checking this step, you need to read the following two parts to make it.
◆ Use other ways to sync iPhone
iPhone won't sync problem can be easily solved by this method. When you have the need to transfer iOS data between iPhone and computer, you can also rely on other syncing tools. Want to knnow the best way to sync iPhone data? You can directly check Part 3.
When you face the iPhone won't sync issue, these methods above are the basic ways to check why your iPhone won't sync and get rid of this problem. If the problem is still there, you can move on to the next solution.
In case you didn't take the right steps to sync iPhone with iTunes, here we show you how to make iPhone sync step by step.
Step 1 Run iTunes on your computer, and plug your iPhone to computer with the USB cable.
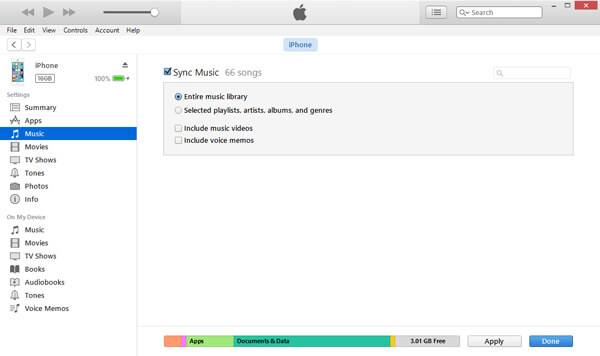
Step 2 After iTunes detects your iPhone, you will see an iPhone icon shows on the top side. Click "Music" on the left side, and you will find "Sync Music" option.
Step 3 Choose the option from "Entire Music Library", "Selected playlists, artists, and genres", "Include music videos" and "Include voice memos" to transfer music or playlist from computer to your iPhone.
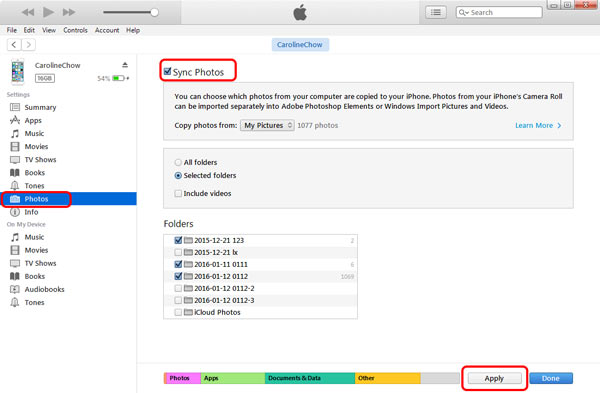
Step 4 For syncing photos to iPhone, you just need to click "Photos" > "All folders"/"Selected folders"/"Include videos" to move photos from computer to your iPhonw with iTunes.
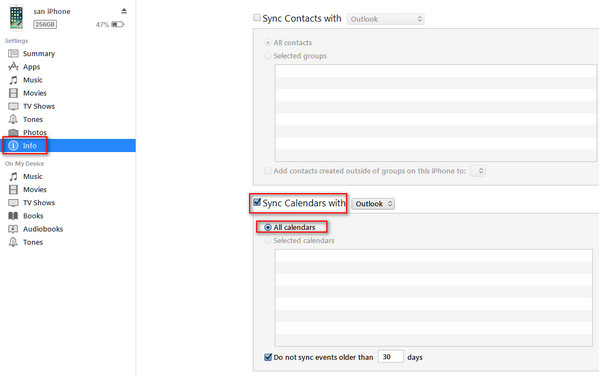
Step 5 For calendar, you are able to click "Info" > "Sync Calendars with" > Select "Outlook" or other calendars to make the transfer.
Step 1 Still plug your iPhone to your computer with USB cable, and find and click your iPhone icon on iTunes.
Step 2 Click "Summary" > "This computer" > "Back Up Now" to sync your iPhone data to iTunes.
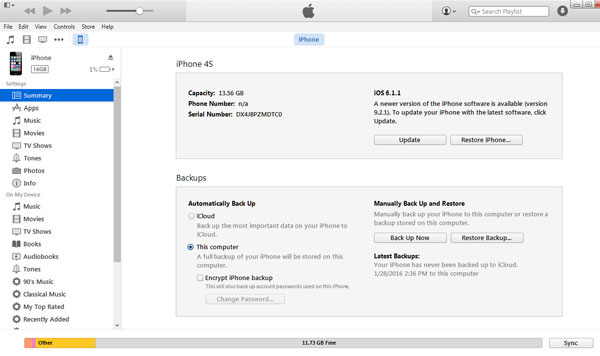
Check this part to see what data iTunes sync from iPhone
Commonly, Mac is one of the good tool that lets you sync your iPhone photos to Mac automatically with iPhoto, when you connect your iPhone to Mac. However, still some accidents may happen and lead you to failing to make iPhone sync.
Check the following basic solutions to fix this issue:
1. Remove the "iPhone Photo Cache" folder from "My Pictures" folder.
2. Unplug iPhone and shutting down iPhoto and iTunes, and then plug iPhone and restart iTunes and iPhoto.
3. Change an USB cable or port to see if your iPhone displays in Image Capture (Use Spotlight to find Image Capture, which you can open using the "Command-Spacebar" key combination).
4. Update iPhoto software.
5. Restart iPhone and Mac.
After trying the above two solutions, you won't sync your iPhone again, then you could try the third method to sync iPhone with FoneTrans.
Step 1 Run FoneTrans on your computer (Windows or Mac). Meanwhile, plug iPhone to computer with USB cable.
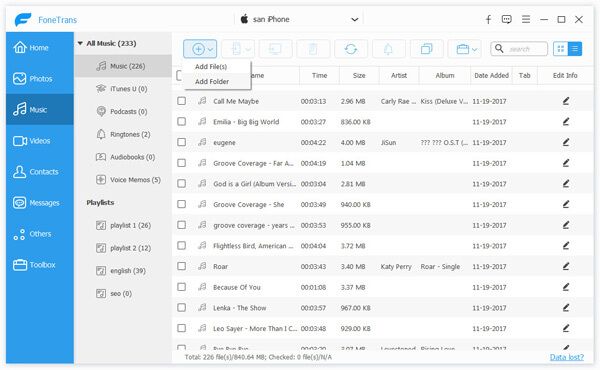
Step 2 Sync music, photos, and books from computer to iPhone.
Click "Media" > "Add" to import music, photos, or books from computer to iPhone.
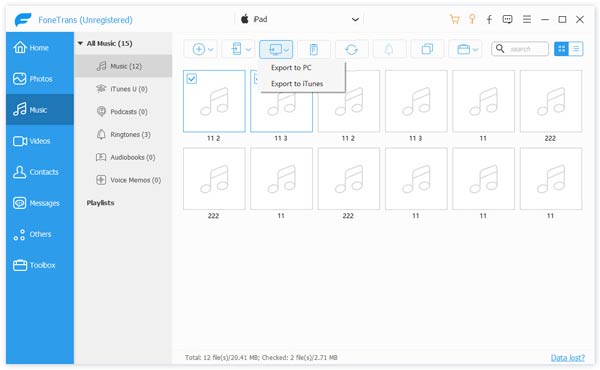
Step 3 Export iPhone music/books to iTunes/computer
Click "Media" > Select the music or books and click "Export to" > "Export to iTunes Library"/"Export to PC" to sync iPhone data to iTunes/PC.
Conclusion: The above three solutions are for your reference to help fix the issue iPhone won't sync.
In this post, we mainly talk about the iPhone won't sync issue. You should know that, various reasons may cause your iPhone won't sync with computer through iTunes. We show you some basic ways to fix the issue. Moreover, a professional solution is also offered to help you get out of the situation that iPhone won't sync. Hope you can solve the problem and better manage your iOS data after reading this page. If you have any other solutions, please leave us a message.