You may feel hard to get lost Word document back, especially unsaved Word file on Mac. This post shows 5 best solutions to ensure you easily recover unsaved Word document 2019/2016/2017/2013/2011/2015 from Mac.

Don't you have a habit of saving your Word document every now and then while editing? Get a Word document that accidentally closed without saving? You are more likely to lose some new content due to various reasons. All operations after the previous saved state are gone. What should you do?
Microsoft Word document content loss on Mac may easily occur. You won't care about it until one day you lose one important file. You edit and do lots of work on a Word document and forget to save it. You prefer to directly recover an unsaved Word file rather than write it again, and you come here to look for a way. Then you hit the right place; the following parts will show you how to recover unsaved Word documents on a Mac.


In fact, Mac data recovering software can be the best option to recover deleted/lost files, including unsaved Word document on Mac. In case you have tried all methods you knew and fail to get lost data back, here at the first part, we sincerely recommend the professional Mac Data Recovery to help you recover unsaved Word 2019/2016/2017/2011/2013 document on Mac.

Downloads
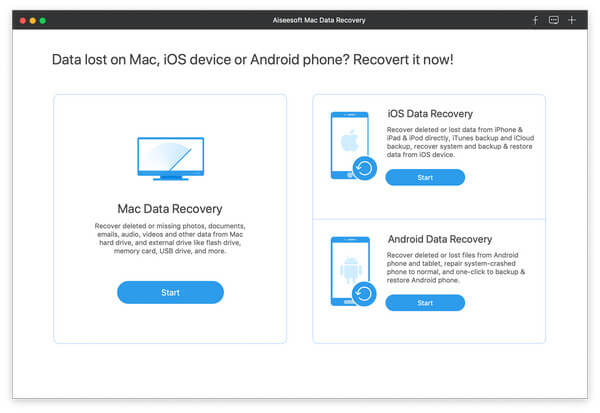
Double click the download button above to free download, install and run this powerful Mac data recovering software on your Mac. Make sure you download the right version. When you enter its main interface, choose the "Mac Data Recovery" feature.
This all-featured data recovery software enables you to recover many frequently-used data types like photos, audio, videos, emails, documents and more. If all your need is to recover unsaved Word document, here you can only choose Document. It will quick the scanning speed.
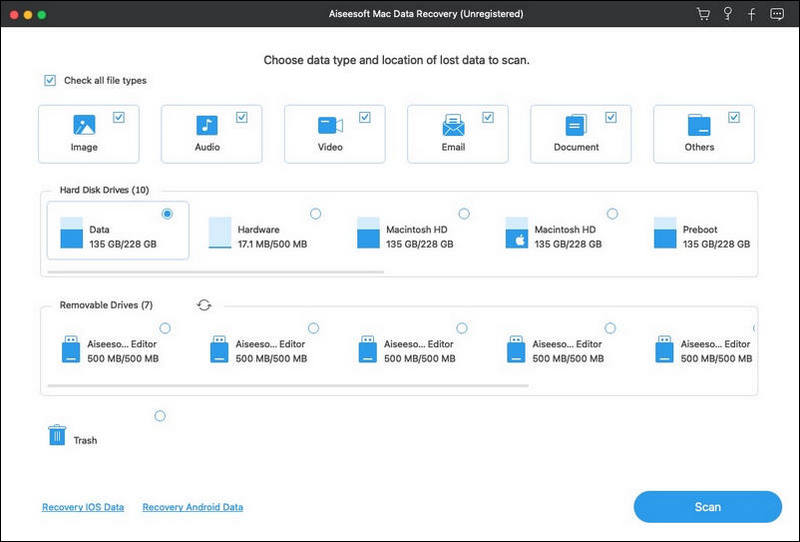
Click "Scan" to start a quick scan on your Mac. It also offer a Deep Scan feature in case you can't find the deleted or lost data.

After scanning, you can see all your files from the results. You can click specific data type on the left pane. You can quickly find the unsaved Word file through filter feature, data type or path list.
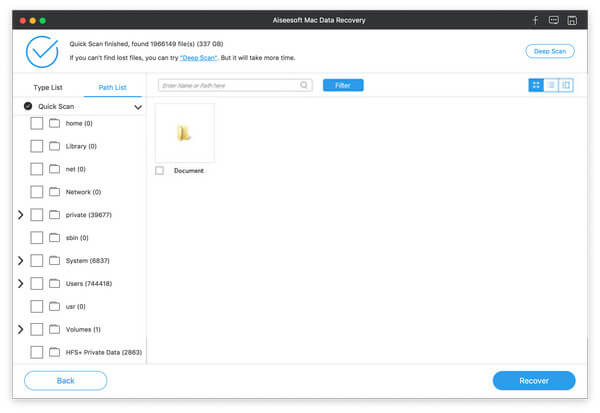
You are allowed to view each file by double clicking on it. Select files you want to restore and then click the "Recover" to recover your unsaved Word documents on Mac.
Many reasons will cause your unsaved Word document gone. Go without saying that, when you lose some data on Mac, Trash will definitely be an important place where you want to get them back. So first, you can open Trash folder to look for your missing Word file.
You can double click Trash icon in the dock to open Trash folder. You can see many contents of the trash. When you find the Word file, you can right click on it and choose "Put Back" to recover unsaved Word document on Mac. Read more about how to recover Trash on Mac.


Now, you will find your lost file is in its original region.
However, if you clear your Trash folder accidentally, I recommend the way above, which is easier and offers a high success rate of getting your important Word doc back.
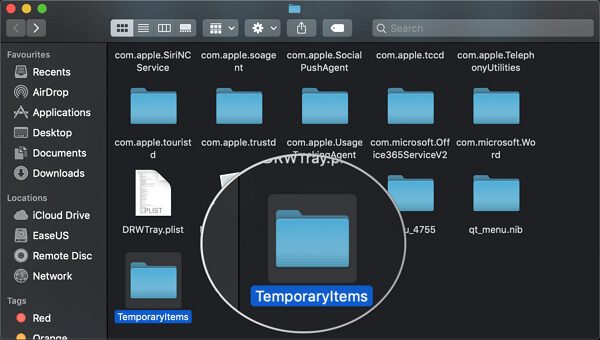
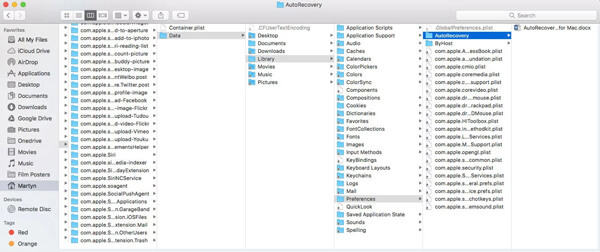
To recover unsaved Word document on Mac, you can rely on the Temporary folder. Mac Temporary folder may keep some files temporarily. Most users don't know this method because this folder is hard to find. You can check the path below to look for your lost document.
You should know that, the powerful Word software is equipped with a built-in auto save feature, for both Mac version and Windows version, called AutoRecovery. It has the capability to automatically save the document you are working on. You can restore Word document through this function. This method works for Word 2019, Word 2016, Word 2017, Word 2013, Word 2011, and Word 2015.
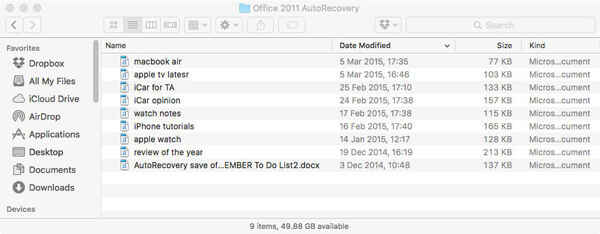
Note: The unsaved Word file need to initially be saved with a name on your Mac. Or you can't use this method to find and recover unsaved Word document.
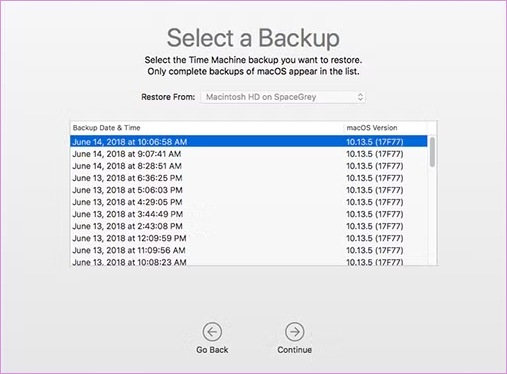
Time Machine provides a simple way to back up data on your Mac. Same time, you can rely on it to restore all types of files on Mac. Time Machine is able to make a copy of everything on your Mac. But we have to admit that, for unsaved Word document, you have little hope to get it back from Time Machine backup. But if you want to restore some deleted/lost Word files from Time Machine, it will turn be a good solution.
Without a doubt, it is vexing to find your Word doc unsaved, and if you haven’t a backup, it might be hard to retrieve the lost doc. So, we recommend some tips here to avoid losing your Word doc.
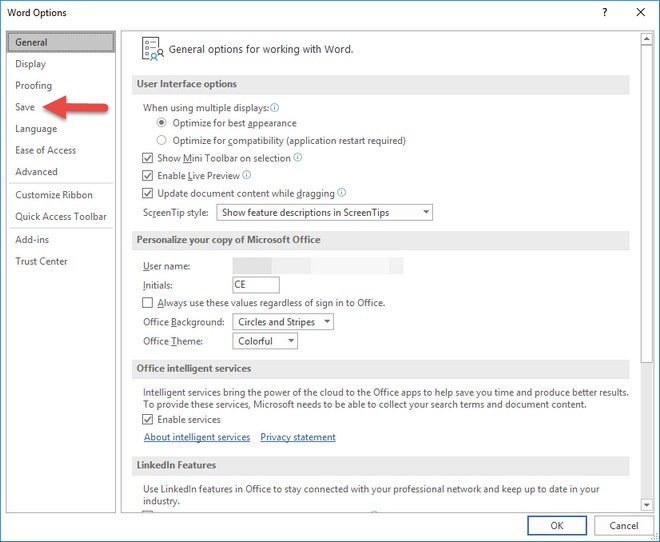
Enable AutoSave Feature
Using Microsoft Word’s built-in AutoRecovery Feature can save your work at regular intervals, effectively avoiding a Word doc loss. To enable Auto Save feature, you can follow the steps below:
Regularly Save Your Work Manually
While AutoSave is helpful, it’s essential to develop the habit of saving your document manually. Using keyboard shortcuts like “Command + S” frequently to save your progress can be convenient and save more trouble.
Utilize Cloud Storage Solutions
Storing your documents in cloud services like OneDrive, Google Drive, or Dropbox provides an additional layer of security. These services often have their own version history and recovery options. They allow you to access your documents from any device with internet access. Ensure you regularly sync your files with the cloud service for real-time backups.
Conclusion
We have shared 6 effective ways on how to recover unsaved Word documents on Mac. I hope you can easily find your Word file after reading the page. And to avoid such Word doc loss, you can follow the tips to enable the AutoSave feature, or just develop a habit of manual saving. If you still have any questions or need a better solution, you can tell us in the comments.
 4 Super Easy Ways to Recover a Corrupted Word DOC/DOCX File for Free
Here're 4 workable ways to fix 'The file is corrupt and cannot be opened' error in Microsoft Word. You can recover a corrupted Word file for free online and offline without technology background.
 [100%] Best 5 Solutions to Recover Excel File That Was Saved Over
How to recover the Excel file that is saved over? This page collects the best 5 ways to retrieve the overwritten Excel files. There is always one method for you.
 [Never Miss] How to Find Recover Documents in Word
Accidentally lose some important word documents? This post offers two methods - do the recovery as Microsoft Office tells you or let Aiseesoft data recovery software help.
Recover Document on PC/Mac
Recover Lost Pages Documents Mac Recover Overwritten Files on Mac SD Card Recovery Mac Recover Unsaved Word Document on Mac Recover Files from USB Flash Drive on Mac Recover a Corrupted Word File Best Way to Recover Deleted Files
Aiseesoft Data Recovery is the best data recovery software to recover deleted/lost photos, documents, emails, audio, videos, etc. from your PC/Mac.
![]() 100% Secure. No Ads.
100% Secure. No Ads.
![]() 100% Secure. No Ads.
100% Secure. No Ads.