Getting Started
Introduction
Aiseesoft Data Recovery is the professional data recovering software, which can help you recover the deleted/lost files from computer, recycle bin, hard drive, flash drive, memory card, digital camera and more with ease. Whether the data loss is caused by accidental deletion, emptying recycle bin, RAW hard drive, RAW partition, partition loss, operating system crashed, bootable problems or other reasons, you can easily find them back with this powerful data recovery tool.
Install and Register
Before you begin installing this software, you need to free download the installation package. Then, follow the tutorial to install the program.
After installation, launch the program. You will see a pop-up window reminding you to register. Enter the email address and registration code to complete the registration of Aiseesoft Data Recovery.
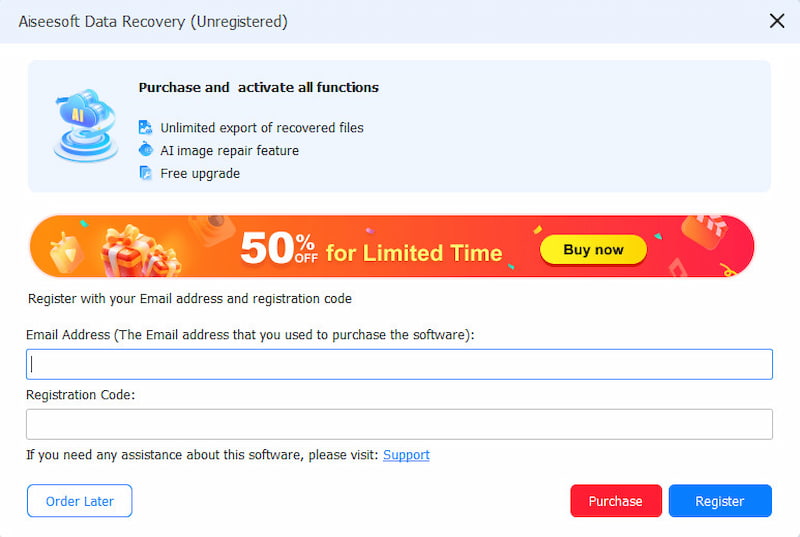
Note: The registration code will be sent to you via email. If you have not received an email from us, please contact our support team.
Email Address: The email address that you fill in the order form.
Registration Code: A string of characters marked as Activation key, license code, or KEYCODE(S) in the order confirmation letter you received after the successful purchase.
Recover Lost Data from Hard Drive
Step 1 Launch Aiseesoft Data Recovery
Download, install and run this data recovery software on your computer.
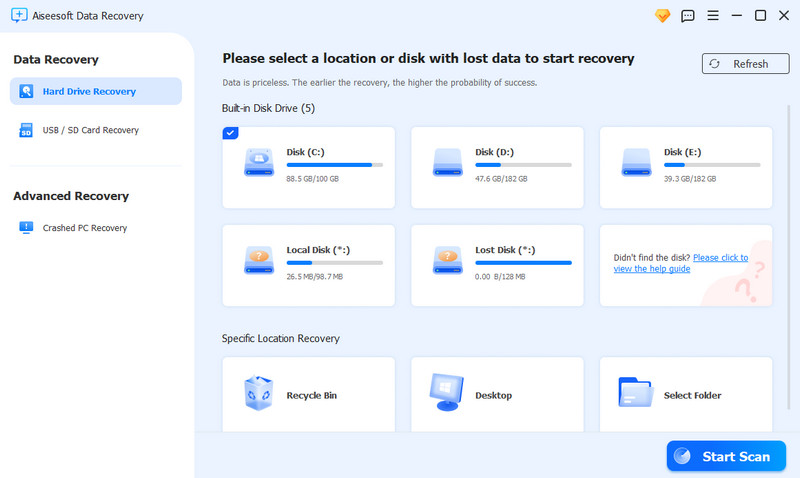
Step 2 Select disk drive
Aiseesoft Data Recovery enables you to recover any popular file type like image, document, email, audio, video and more. When you enter the main interface, choose disk drive(s) where you may find the lost files.
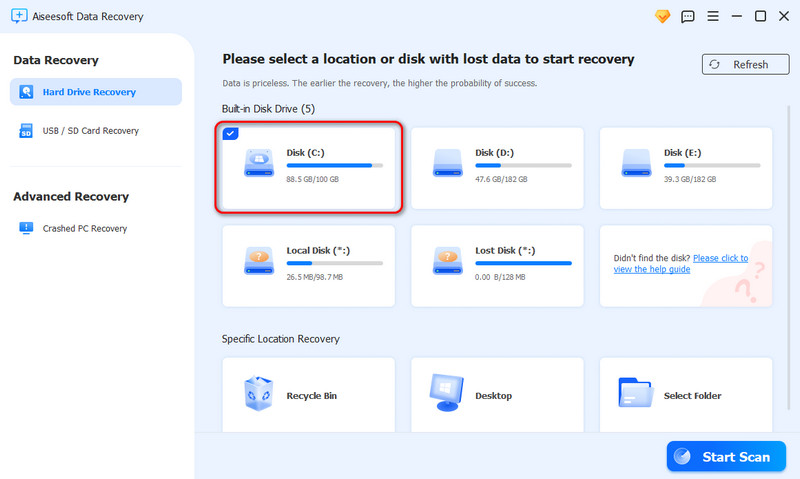
Step 3 Scan data
Clicking the Start Scan button will provide you with a quick scan on the selected disk drive. In the scanning process, you can choose to Pause or Stop the scanning.
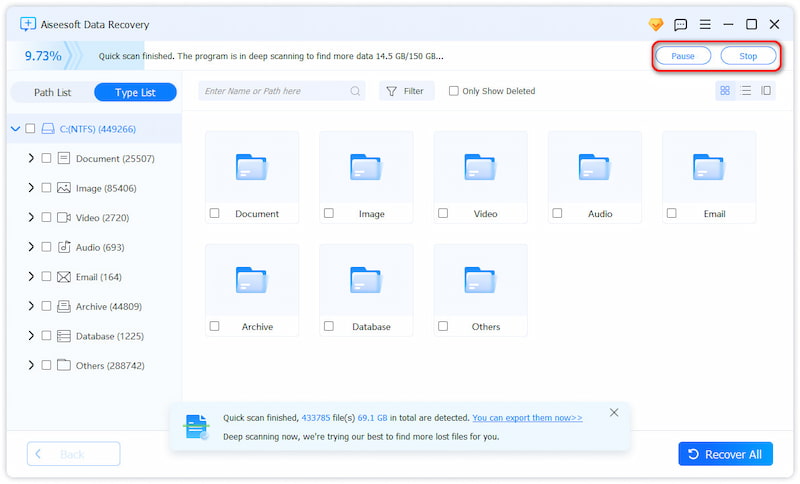
Step 4 Choose data
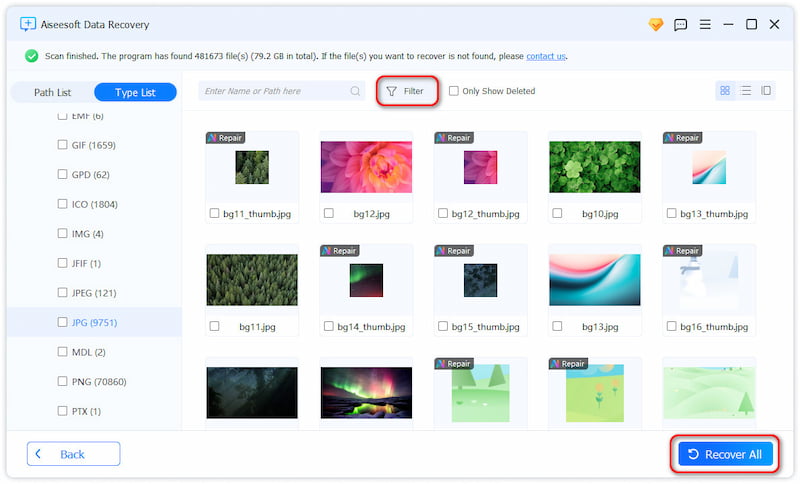
After scanning, all the deleted or lost files will be listed in the interface. You can use the Filter feature to quickly locate the files you want to recover.
Step 5 Recover data
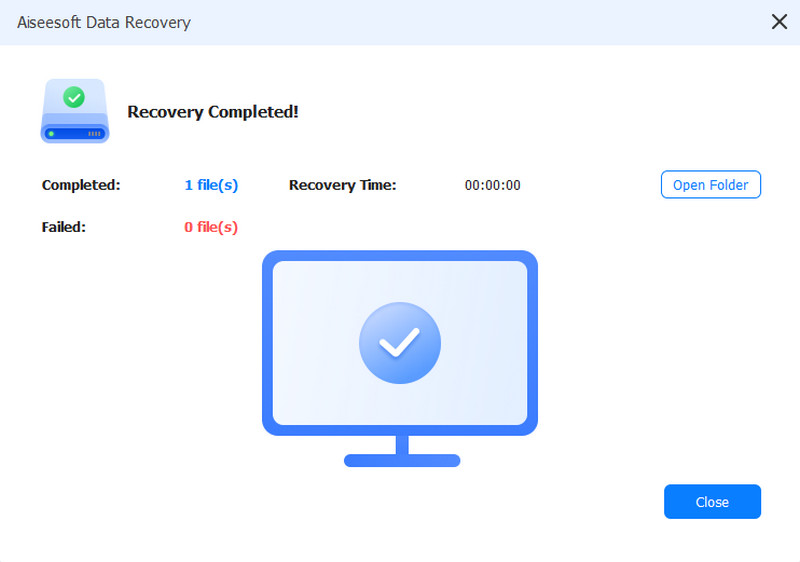
After selecting the files you want to recover, click the Recover All button. With just one click, you can easily restore all the selected files to your computer.
Recover Lost/Deleted Data on Mac
Step 1 Run Mac Data Recovery on Mac
Free download this Mac data retrieval tool on your Mac. Launch it immediately after its installation.
Step 2 Disable System Integrity Protection
For Mac running Mac OS X El Capitan or later, you need to disable System Integrity Protection firstly for using Data Recovery on your Mac. Check the details here: How to disable System Integrity Protection.
After that, you can operate Mac Data Recovery on your Mac normally.
Step 3 Scan Mac
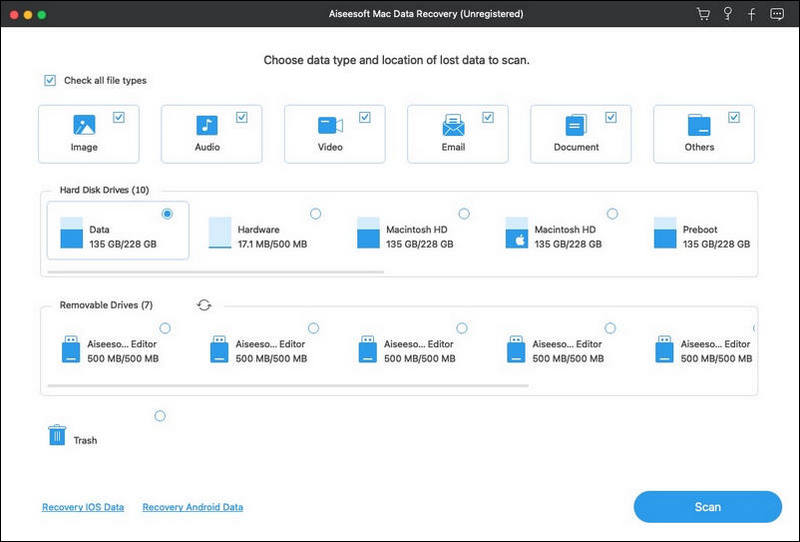
In the main interface, you need to checkmark the data types and disk drive for scanning.
Here you are able to scan images, audio, video, email, documents and other data.
As for the drive, you need to tick your Mac drive.
Moreover, this software also lets you scan the external drive on your Mac, like camera card, flash drive card, and more.
Click Scan to start a quick scan on your Mac.
Step 4 Recover data
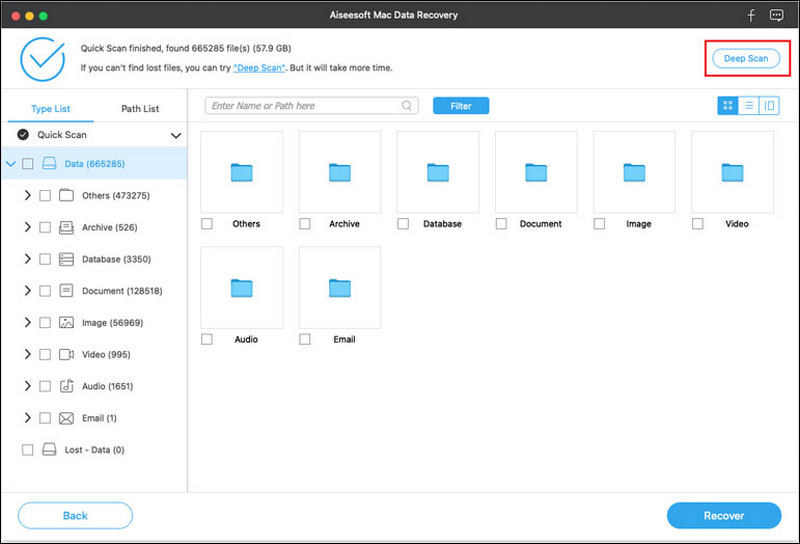
After the scan is complete, you will find all your data types listed in the result. From the left pane, you can see the basic data types, click it to view the data details on the right window and Recover to extract the lost or deleted data to your Mac.
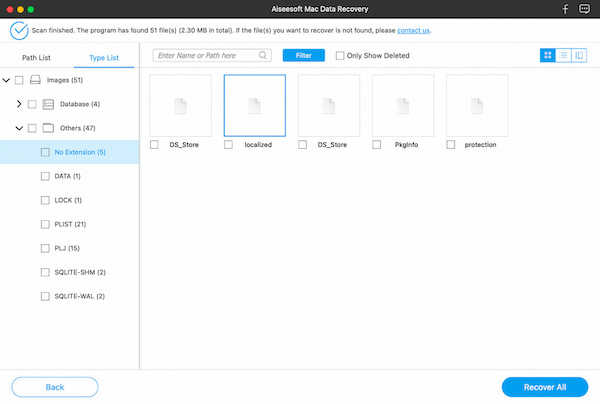
You are able to view the scanning result by selecting Path List to locate what you want exactly.
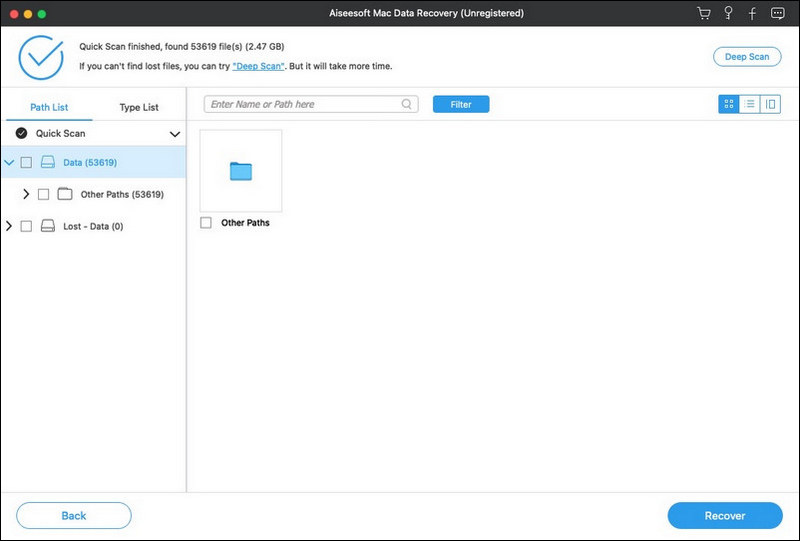
Surely, if you cannot find the data you want to recover, just start Deep Scan to take more time to get a Mac data scan thoroughly and completely.
Recover Lost Data from USB/SD Card
Step 1 Launch Aiseesoft Data Recovery
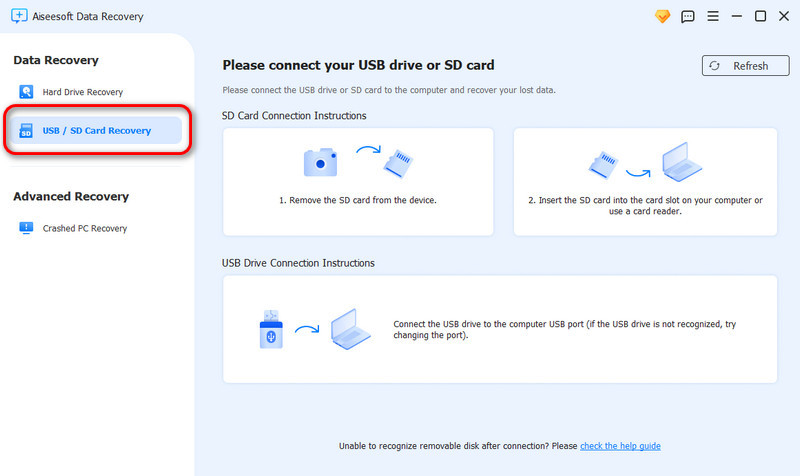
Download, install, and run this data recovery software on your computer. Choose USB/SD Recovery on the left menu of the interface.
Step 2 Scan Disk
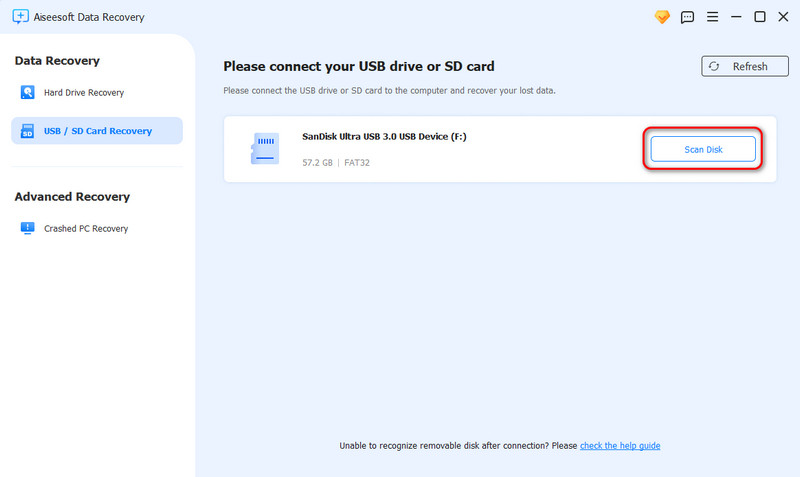
Connect your USB drive or SD card to the computer. Then, click the Scan Disk button to start scanning.
Step 3 Choose Data
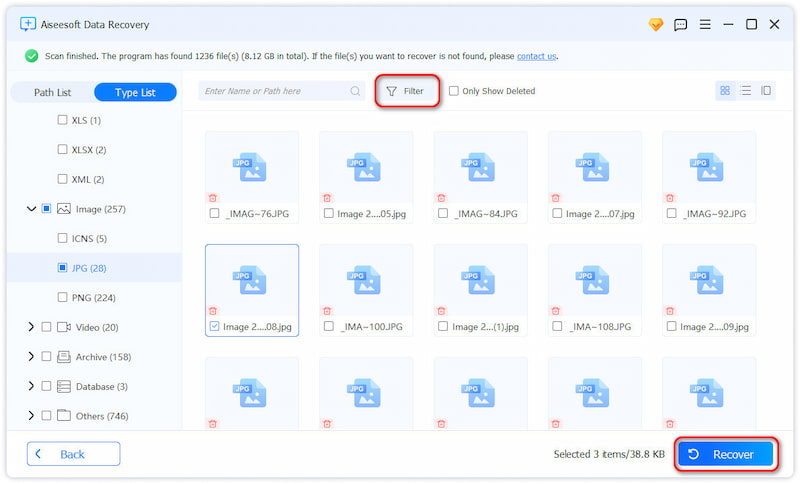
After scanning, the interface will list all the deleted or lost files. You can use the Filter feature to locate the files you want to recover quickly.
Step 4 Recover Data
After selecting the files you want to recover, click the Recover button. You can easily restore all the selected files to your computer with just one click.

Repair Your Photos With AI
Step 1 Launch Aiseesoft Data Recovery
Download, install, and run this data recovery software on your computer.
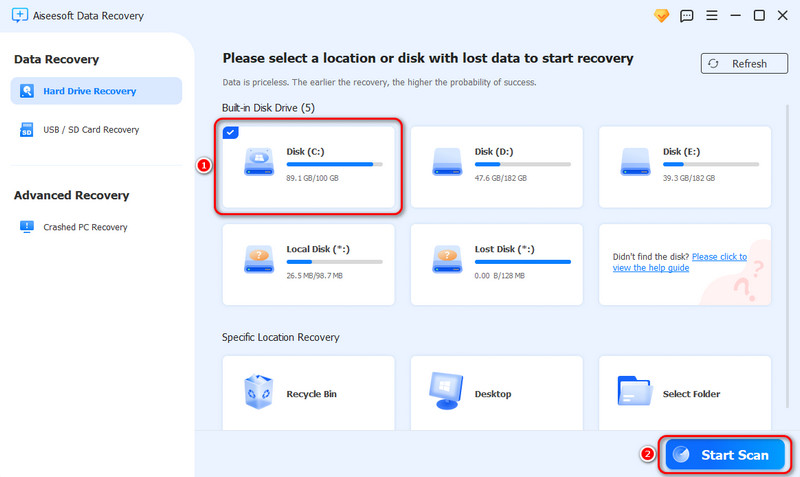
Aiseesoft Data Recovery enables you to recover any popular file type like image, document, email, audio, video and more. When you enter the main interface, choose disk drive(s) where you may find the lost files. Then click Start Scan.
Step 2 Scan Data
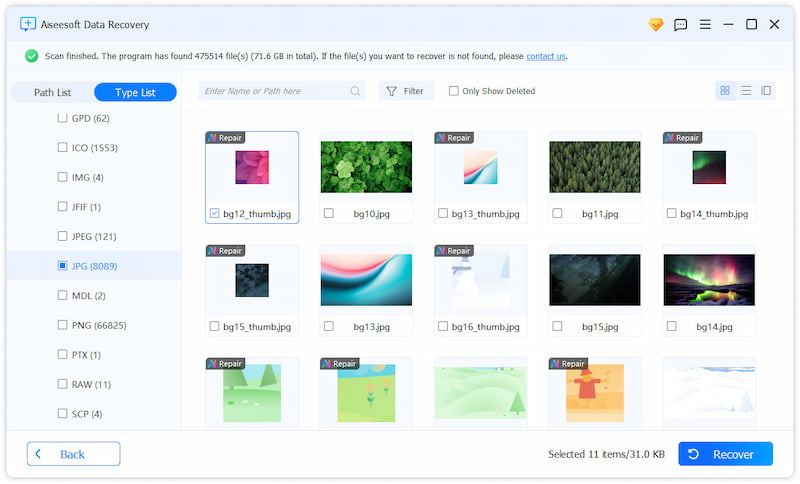
After the scan process is finished, you can select the photos you want to recover, one very surprising feature is that you can see an AI Repair icon on the top left of some images that can be repaired by AI.
Step 3 Use AI Repair
Click the photo you want to repair twice, and then you will enter a new interface. Click the AI Repair button to make your picture clearer and more beautiful.

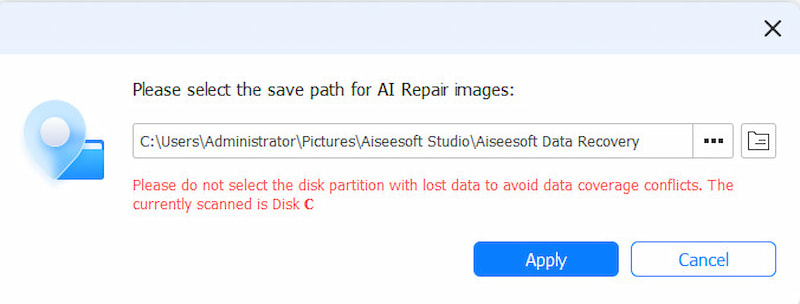
Then, choose the folder you want to save. Your photos will automatically start processing.
Step 4 Recover Data
After processing, you will see a set of comparison images. Click Open Image Location to see the final repaired image restored to your computer.

In the end, your photos will be saved to your computer quickly and clearly.
Recover Data from Crashed Computer
Your computer may crash sometimes. Don’t worry. It’s a common problem that most people face, and there are some effective ways to solve it. You can recover all your data from a crashed PC with the help of Aiseesoft Data Recovery software by simply following the tutorial below.
Create a Boot Disk
Step 1 Launch Aiseesoft Data Recovery
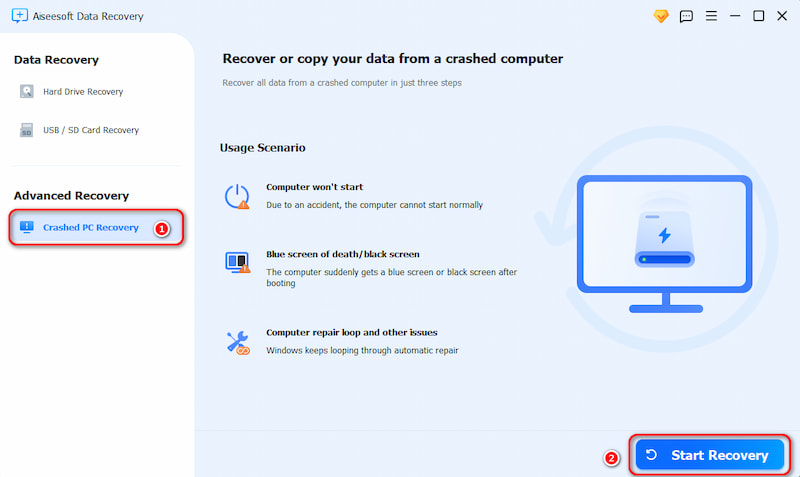
Download, install, and run Data Recovery. Choose Crashed PC Recovery from the interface's left bar. Then, click Start Recovery.
Step 2 Create a Bootable USB Drive
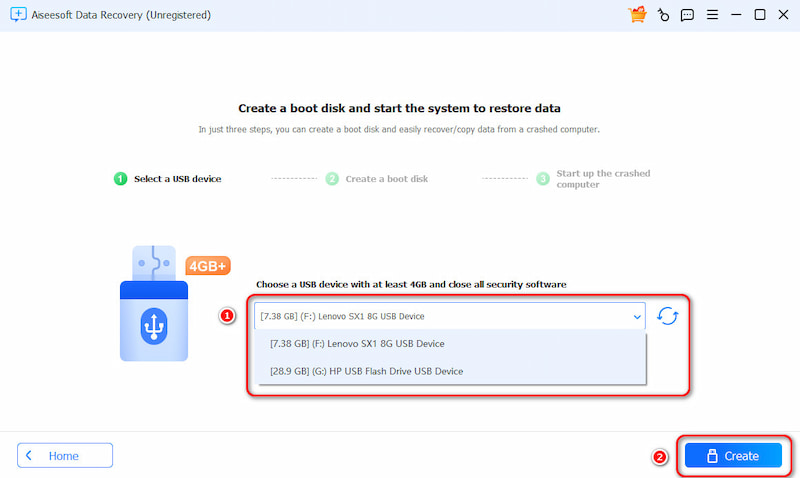
Connect your USB device to Create a Bootable USB Drive according to the system requirements. Select a USB device above 4G and click Create.
Step 3 Confirm Format and Create
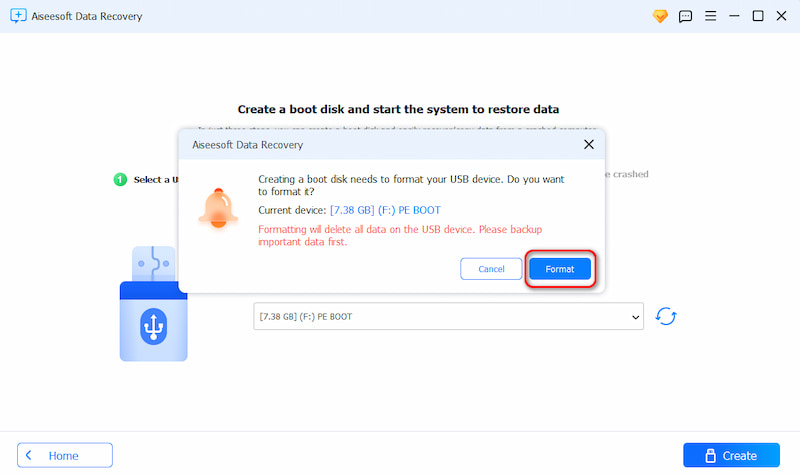
After that, a pop-up window will appear, informing you that your USB device will be formatted. When you confirm, click Format to continue.
Note: Don't forget to back up your data before formatting.
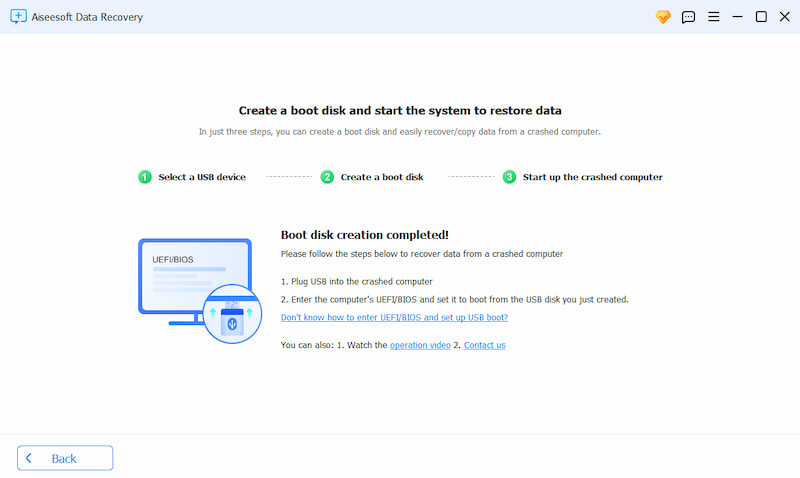
Step 4 Creation Completed
The creation will start and complete automatically. All you need to do is wait for a while.
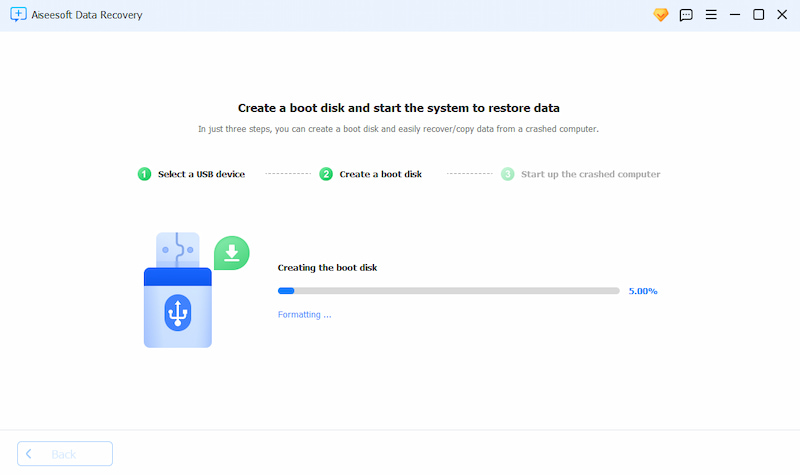
After successfully creating the bootable USB Drive, please connect it to the crashed computer.
Boot Crashed Computer
Step 5 Press Hotkey
Plug the USB device you created into your crashed computer, boot it, and repeatedly press the BIOS/UEFI hotkey.
It's worth mentioning that the hotkey varies by computer manufacturer. The picture below shows them in detail.
| Manufacturer | Type | Possible Keys |
| ASUS | Desktop | F8 |
| ASUS | Laptop | Esc |
| ASUS | Notebook | Esc, F8 |
| Acer | Esc, F12, F9 | |
| Acer | Notebook | F12 |
| Compaq | Presario | Esc, F9 |
| Dell | Desktop/Laptop | F12 |
| Fujitsu | Laptop | F12 |
| HP | Desktop/Generic | Esc, F9 |
| HP | Laptop/Notebook/Tower | Esc |
| Intel | F10 | |
| Lenovo | Desktop | F12,F8,F10 |
| Lenovo | Laptop | F12, Nano Button, Fn+F11 |
| Lenovo | Notebook | F12 |
| Samsung | Esc, F12 | |
| Samsung | Notebook/Ultrabook | Esc |
| Samsung | Ultrabook Ative Book | F2 |
| Sony | Laptop | Assist Button, Esc, F11 |
| Toshiba | Laptop/Protege/Satellite/Tecra/Equium | F12 |
| NEC | F5 | |
| Packard Bell | F8 | |
| eMachines | F12 | |
| Sharp | - |
Step 6 Enter BIOS Setup
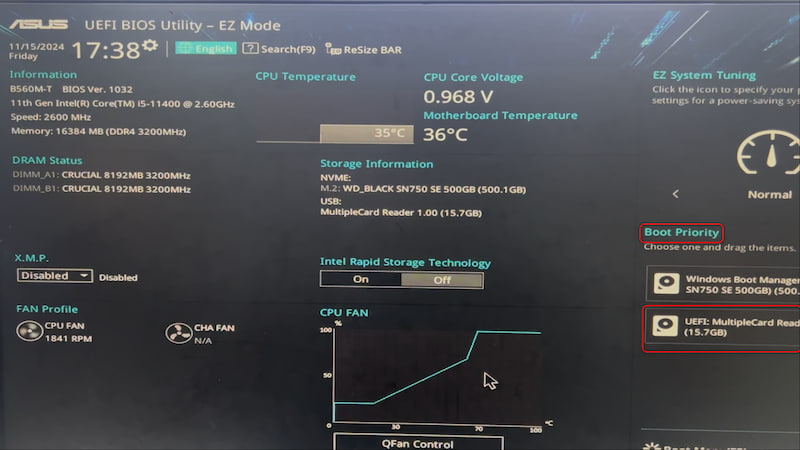
After entering the BIOS, use the arrow keys to switch to the boot tab, and then select the USB boot device. If you can't find the created boot disk in the boot tab, try the rear USB port.
Step 7 Recover Data
It will automatically boot from your USB device. Aiseesoft Data Recovery will then start automatically. You can scan the disk to recover lost files or copy data now.
Video Tutorial
-
Recover Overwritten Files on Mac/Windows [99% Successful]
There are 4 proven ways to recover overwritten files. You can do as it tells to get back the overwritten or replaced files quickly. Just read and check.
 Posted by Amanda Brown | 10.01.2025
 -
How to Recover Photos from Android/iPhone/Windows/Mac [2024 Updated]
Accidently delete some valuable pictures? Find the best photo recovery tools to help you recover deleted/lost photos from this post.
 Posted by Iris Walker | 02.02.2021
 -
Ultimate Ways to Recover Shift Deleted Files (Permanently Deleted)
Yes, you can recover shift deleted files on Windows 10/8/7 easily here. This article shows you 3 easy ways to recover permanently deleted files, especially for beginners.
 Posted by Andrew Miller | 20.08.2018
 -
RAID Data Recovery – Recover Files and Configuration Free and Paid
This is the handy guide to recover data and configuration parameters from RAID 0, 1, 3, 4, 5, 6, 1E, 5E, 5EE, 10, 50, 60, etc. Free and paid software are available to help you get the recovery.
 Posted by Amanda Brown | 11.12.2022
 -
[100%] Best 5 Solutions to Recover Excel File That Was Saved Over
How to recover the Excel file that is saved over? This page collects the best 5 ways to retrieve the overwritten Excel files. There is always one method for you.
 Posted by Amanda Brown | 20.04.2018
 -
[100% Working] Video Recovery from Computer and Android Phone
Accidently delete some captured videos on Android or computer? You can learn here to get videos recovery with software, even without rooting phone.
 Posted by Iris Walker | 16.12.2020
 -
[99% Successful] Recover Permanently Deleted Files on Windows 11/10
Delete files by accident or other problems? We will show you how to recover deleted files on Windows 11/10/8/8.1/7 quickly and efficiently in this article.
 Posted by Andrew Miller | 09.12.2024
 -
3 Ways to Recover Deleted Pictures from SD Card
Are you still feeling annoyed about how to recover deleted pictures from SD card? Read this article to follow the 3 ways to recover deleted photos from SD card with simple clicks.
 Posted by Iris Walker | 15.12.2020
 -
All You Need about GetDataBack and Its Alternatives
This is the complete guide of GetDataBack reviews. What's more, you can use other data recovery software to get data back from external hard drive easily.
 Posted by Andrew Miller | 22.08.2018
 -
[2025] 5 Best Tools to Recover Deleted Files on Mac
This post offers the top 5 Mac data recovery software to help you retrieve your important but lost data. Check it and discover the most appropriate one for you.
 Posted by Nicole Jones | 01.11.2024
 -
Text Recovery – Recover Deleted/Lost/Unsaved Notepad/WordPad Text
Lost or deleted text files from your Notepad, Text or WordPad app? Learn the easiest 4 ways here to recover the text files from temp files, previous version and the help of Text File Recovery software.
 Posted by Amanda Brown | 20.04.2018
 -
Recover Deleted Files from Recycle Bin on Windows 10/8/7
This tutorial shows you 2 ways to recover deleted files from Recycle Bin after emptying on Windows 10/8/7, so that you can perform Recycle Bin recovery easily.
 Posted by Andrew Miller | 20.08.2018
 -
[Updated] 2025 Top 5 Hard Drive Recovery Software
This article provides the best 5 hard drive recovery tools in 2025. Check our post and discover the most appropriate one to recover your data from hard drives.
 Posted by Nicole Jones | 01.11.2024

