Green Screen effect or technically known as chroma key composition. Usually the effect place subject in front of a green (blue) screen, and then cut the subject out from the green screen to superimpose it over another video. The article will explain the detail about how to use green screen effect of iMovie.

If you record a video in front of a single colored green or blue background, you can replace the background with any other video clip, graphic or still image as you like. This is called a green-screen or blue-screen effect in iMovie.
If the subject of your video is green or is wearing green, you should record in front of a blue background. Likewise, if the subject of your video contains blue or is wearing blue, you should record in front of a green background.
1. iMovie 11
2. Mac computer
3. Chromakey Green footage
4. Background video
The initial thing you should do is recorded some video footage with the green or blue background supported by iMovie, if you have any problem for import the video file to iMovie, just use the best Video Converter for iMovie. Green color is frequently used than Blue or other colors. It is an important effect of iMovie.
With this interesting effect, it's easy to superimpose anything into any shot. For example, you can transport yourself to anywhere you like, or appear in your favorite movies. That's funny, right? Then how to use green screen effect in iMovie? Here is a step by step tutorial.
Step 1 Launch the iMovie 11 program
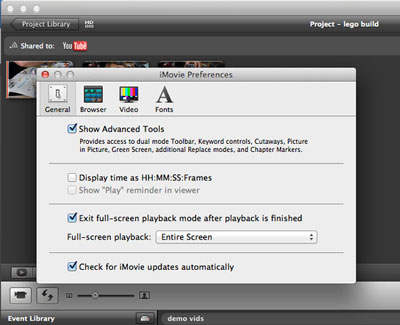
In order to use Green screen, you might need to activate the "Show Advanced Tools" from the "Preferences" menu of iMovie first.

Step 2 Load videos to iMovie
Add the background video or still image to iMovie, and then import the green screen footage as well.
Step 3 Add green screen to video
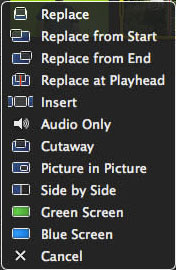
Drag the green screen footage video you shot onto the timeline of the background video. The popup Windows will enable you to select the "Green Screen" as the screenshot.

Step 4 Adjust timeline of video
After you add green screen with iMovie, you can get green screen footage on the top of the background video. And then adjust the timing to get the desired video.
Step 5 To apply the change, click the Apply button in the Green/Blue Screen controls.
Of course, you might also need some adjustment for the transparent effect or cutaway effect to make the whole video perfect. And now you can enjoy the video added green screen of iMovie. If you have any query for using iMovie, you can learn the detail from the video tutorials from iMovie Tutorial.
If you like, you could add more iMovie themes to make your videos more vividly.
If you want to know how to edit videos with iMovie, you can check the video tutorial down below:

